
The rules and conventions governing how the nodes in a CGNS file are organized, including their names and labels, are specified in the SIDS document, with additional details in the SIDS File Mapping Manual. These documents also specify in detail how CFD information is to be stored within the nodes in a standardized fashion so that other users can easily access and read it. When a CGNS file strictly adheres to the rules given in the SIDS document, it is said to be "SIDS-compliant." A CGNS file must be SIDS-compliant in order for other users to be able to properly interpret it. A brief overview of the most commonly used aspects of the SIDS is included in the current document.
However, to get started with CGNS, it is not necessary for the user to fully understand the SIDS document. The mid-level, or API calls have been created to aid users in writing and reading CGNS files that are SIDS-compliant. [There are currently two levels of programming access to CGNS. The lowest level consists of CGIO-level calls which interact directly with the database manager. These calls perform the most basic functions, such as creating a child node, writing data, reading data, etc. However, these low-level calls know nothing at all about the SIDS, so the user is responsible for putting data in the correct place, to make the CGNS file SIDS-compliant. The mid-level, or API calls, which always begin with the characters "cg_", were written with knowledge of the SIDS. Therefore, it is easier to adhere to the SIDS standards when writing a CGNS file using the API calls, and some checks for SIDS-compliance are also made by the API calls when accessing a CGNS file (SIDS compliance is not guaranteed, but the API calls go a long way toward facilitating it). The API calls also drastically shorten the calling sequences necessary to perform many of the functions needed to create and read CGNS files.] Using the API, most CFD data of interest to the majority of users can be written into or read from a CGNS file very easily with only an elementary understanding of the SIDS.
In the following sections, we give detailed instructions on how to create typical CGNS files or portions of files. These instructions are given in the form of simple examples. They make use of the mid-level API calls, although not all API calls are covered in this document (a complete list of available API calls can be found in the Mid-Level Library document). We recommend that the user read through the examples in this section in order, because some information in the later sections depends on being familiar with information given in the earlier ones. Hopefully, users should be able to easily extend these simple examples to their own applications. Additional applications are covered in a later section. For those users already familiar with the PLOT3D format for CFD data [Walatka, P. P., Buning, P. G., Pierce, L., Elson, P. A., "PLOT3D User's Guide," NASA TM 101067, March 1990], we include a detailed description on reading and writing PLOT3D-type variables in a CGNS file.
Also note that we have delayed the discussion of units and nondimensionalization until later. For now, all examples simply store and retrieve pure numbers, and it is assumed that the user knows what the dimensions or nondimensionalizations of each variable are.
This first section gives several structured grid examples, whereas the following section gives unstructured grid examples. However, we recommend that the current section be read first, in its entirety, even if the user is only interested in unstructured grid applications. This is because much of the organization of the CGNS files is identical for both grid types, and later sections of this document assume that the user is familiar with information given in earlier sections.
This first example is for a very simple 3-D Cartesian grid of size
21 × 17 × 9. The grid points themselves are created
using the following FORTRAN code snippet:
   do k=1,nk
      do j=1,nj
         do i=1,ni
            x(i,j,k)=float(i-1)
            y(i,j,k)=float(j-1)
            z(i,j,k)=float(k-1)
         enddo
      enddo
   enddo

A complete FORTRAN code that creates this grid and
uses API calls to write it
to a CGNS file called grid.cgns is shown here
(note that a FORTRAN line continuation
is denoted by a +). This (and all later) coded examples
are available from the
CGNS site
 ,
and summarized in this document in the section
Example Computer Codes.
,
and summarized in this document in the section
Example Computer Codes.
      program write_grid_str
c
c   Creates simple 3-D structured grid and writes it to a
c   CGNS file.
c
c   This program uses the fortran convention that all
c   variables beginning with the letters i-n are integers,
c   by default, and all others are real
c
c   Example compilation for this program is (change paths!):
c
c   ifort -I ../CGNS_CVS/cgnslib -c write_grid_str.f
c   ifort -o write_grid_str write_grid_str.o -L ../CGNS_CVS/cgnslib/LINUX -lcgns
c
c   (../CGNS_CVS/cgnslib/LINUX/ is the location where the compiled
c   library libcgns.a is located)
c
c   cgnslib_f.h file must be located in directory specified by -I during compile:
      include 'cgnslib_f.h'
c
c   dimension statements (note that tri-dimensional arrays
c   x,y,z must be dimensioned exactly as (21,17,N) (N>=9)
c   for this particular case or else they will be written to
c   the CGNS file incorrectly!  Other options are to use 1-D
c   arrays, use dynamic memory, or pass index values to a
c   subroutine and dimension exactly there):
      real*8 x(21,17,9),y(21,17,9),z(21,17,9)
      dimension isize(3,3)
      character basename*32,zonename*32
c
c   create gridpoints for simple example:
      ni=21
      nj=17
      nk=9
      do k=1,nk
        do j=1,nj
          do i=1,ni
            x(i,j,k)=float(i-1)
            y(i,j,k)=float(j-1)
            z(i,j,k)=float(k-1)
          enddo
        enddo
      enddo
      write(6,'('' created simple 3-D grid points'')')
c
c   WRITE X, Y, Z GRID POINTS TO CGNS FILE
c   open CGNS file for write
      call cg_open_f('grid.cgns',CG_MODE_WRITE,index_file,ier)
      if (ier .ne. CG_OK) call cg_error_exit_f
c   create base (user can give any name)
      basename='Base'
      icelldim=3
      iphysdim=3
      call cg_base_write_f(index_file,basename,icelldim,iphysdim,
     + index_base,ier)
c   define zone name (user can give any name)
      zonename = 'Zone  1'
c   vertex size
      isize(1,1)=21
      isize(2,1)=17
      isize(3,1)=9
c   cell size
      isize(1,2)=isize(1,1)-1
      isize(2,2)=isize(2,1)-1
      isize(3,2)=isize(3,1)-1
c   boundary vertex size (always zero for structured grids)
      isize(1,3)=0
      isize(2,3)=0
      isize(3,3)=0
c   create zone
      call cg_zone_write_f(index_file,index_base,zonename,isize,
     + Structured,index_zone,ier)
c   write grid coordinates (user must use SIDS-standard names here)
      call cg_coord_write_f(index_file,index_base,index_zone,RealDouble,
     + 'CoordinateX',x,index_coord,ier)
      call cg_coord_write_f(index_file,index_base,index_zone,RealDouble,
     + 'CoordinateY',y,index_coord,ier)
      call cg_coord_write_f(index_file,index_base,index_zone,RealDouble,
     + 'CoordinateZ',z,index_coord,ier)
c   close CGNS file
      call cg_close_f(index_file,ier)
      write(6,'('' Successfully wrote grid to file grid.cgns'')')
      stop
      end
For FORTRAN code, an include statement pointing to cgnslib_f.h must be present. (The cgnslib_f.h file comes with the CGNS software.) Also, it is imperative that the x, y, and z arrays be dimensioned exactly as (21,17,N), where N ≥ 9 (or else as a one-dimensional array of at least size 21*17*9) for this particular example; this is because the cg_coord_write_f routine writes the first 21*17*9 values contained in the array as it is stored in memory. If x, y, and z are tri-dimensional arrays and the first two indices are dimensioned larger than 21 and 17, respectively, then incorrect values will be placed in the CGNS file. In a real working code, one would probably either (a) use one-dimensional arrays, (b) dynamically allocate appropriate memory for x, y, and z, or else (c) pass the index values to a subroutine and write via an appropriately dimensioned work array.
In this case, the cell dimension (icelldim) is 3 (because the grid is made up of volume cells), and the physical dimension (iphysdim) is 3 (because 3 coordinates define 3-D). (See the section Overview of the SIDS for a more detailed description.) The isize array contains the vertex size, cell size, and boundary vertex size for each index direction. For a 3-D structured grid, the index dimension is always the same as the cell dimension, so this means there are 3 vertex sizes, 3 cell sizes, and 3 boundary vertex sizes (one each for the i, j, and k directions). For structured grids, the cell size is always one less than the corresponding vertex size, and the boundary vertex size has no meaning and is always zero. When writing the grid coordinates, the user must use SIDS-standard names. For example, x, y, and z coordinates must be named CoordinateX, CoordinateY, and CoordinateZ, respectively. Other standard names exist for other possible choices. Finally, basename and zonename must be declared as character strings, and the integer array isize must be dimensioned appropriately.
The grid coordinate arrays can be written in single or double precision. The desired data type is communicated to the API using the keywords RealSingle or RealDouble. The user must insure that the data type transmitted to the API is consistent with the the one used in declaring the coordinates arrays. When it is compiled, the code must also link to the compiled CGNS library libcgns.a. Instructions for compiling the CGNS library are given in README files that come with the CGNS software.
A complete code written in C that performs the same task of
creating grid coordinates and writing them to a CGNS file is given here.
/*   Program write_grid_str.c    */
/*
Creates simple 3-D structured grid and writes it to a
CGNS file.

Example compilation for this program is (change paths!):

cc -I ../CGNS_CVS/cgnslib -c write_grid_str.c
cc -o write_grid_str_c write_grid_str.o -L ../CGNS_CVS/cgnslib/LINUX -lcgns

(../CGNS_CVS/cgnslib/LINUX/ is the location where the compiled
library libcgns.a is located)
*/

#include <stdio.h>
#include <string.h>
/* cgnslib.h file must be located in directory specified by -I during compile: */
#include "cgnslib.h"

#if CGNS_VERSION < 3100
# define cgsize_t int
#else
# if CG_BUILD_SCOPE
#  error enumeration scoping needs to be off
# endif
#endif

int main()
{
/*
   dimension statements (note that tri-dimensional arrays
   x,y,z must be dimensioned exactly as [N][17][21] (N>=9)
   for this particular case or else they will be written to
   the CGNS file incorrectly!  Other options are to use 1-D
   arrays, use dynamic memory, or pass index values to a
   subroutine and dimension exactly there):
*/
   double x[9][17][21],y[9][17][21],z[9][17][21];
   cgsize_t isize[3][3];
   int ni,nj,nk,i,j,k;
   int index_file,icelldim,iphysdim,index_base;
   int index_zone,index_coord;
   char basename[33],zonename[33];

/* create gridpoints for simple example: */
   ni=21;
   nj=17;
   nk=9;
   for (k=0; k < nk; ++k)
   {
     for (j=0; j < nj; ++j)
     {
       for (i=0; i < ni; ++i)
       {
         x[k][j][i]=i;
         y[k][j][i]=j;
         z[k][j][i]=k;
       }
     }
   }
   printf("\ncreated simple 3-D grid points");

/* WRITE X, Y, Z GRID POINTS TO CGNS FILE */
/* open CGNS file for write */
   if (cg_open("grid_c.cgns",CG_MODE_WRITE,&index_file)) cg_error_exit();
/* create base (user can give any name) */
   strcpy(basename,"Base");
   icelldim=3;
   iphysdim=3;
   cg_base_write(index_file,basename,icelldim,iphysdim,&index_base);
/* define zone name (user can give any name) */
   strcpy(zonename,"Zone  1");
/* vertex size */
   isize[0][0]=21;
   isize[0][1]=17;
   isize[0][2]=9;
/* cell size */
   isize[1][0]=isize[0][0]-1;
   isize[1][1]=isize[0][1]-1;
   isize[1][2]=isize[0][2]-1;
/* boundary vertex size (always zero for structured grids) */
   isize[2][0]=0;
   isize[2][1]=0;
   isize[2][2]=0;
/* create zone */
   cg_zone_write(index_file,index_base,zonename,*isize,Structured,&index_zone);
/* write grid coordinates (user must use SIDS-standard names here) */
   cg_coord_write(index_file,index_base,index_zone,RealDouble,"CoordinateX",
       x,&index_coord);
   cg_coord_write(index_file,index_base,index_zone,RealDouble,"CoordinateY",
       y,&index_coord);
   cg_coord_write(index_file,index_base,index_zone,RealDouble,"CoordinateZ",
       z,&index_coord);
/* close CGNS file */
   cg_close(index_file);
   printf("\nSuccessfully wrote grid to file grid_c.cgns\n");
   return 0;
}
.
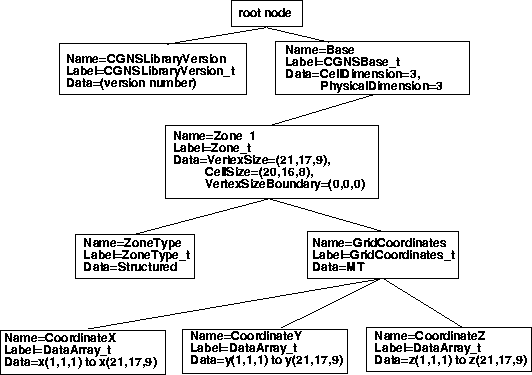
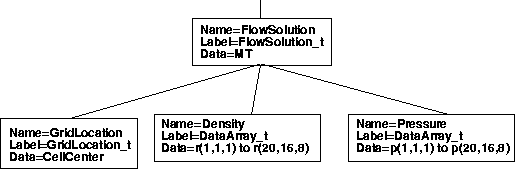
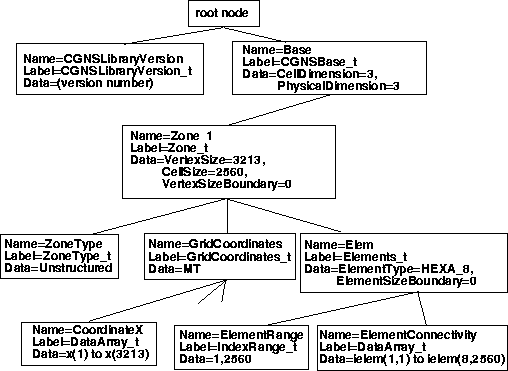
The CGNS file grid.cgns that is created by the code above is a binary file that, internally, possesses the tree-like structure shown below. As mentioned in the Introduction, each node has a name, a label, and may or may not contain data. In the example in the figure, all the nodes contain data except for the GridCoordinates node, for which MT indicates no data.
However, the user really does not need to know the full details of
the tree-like structure in this case. The API has automatically
created a SIDS-compliant CGNS file! Now, the user can
just as easily read the CGNS file using the API.
The FORTRAN code segment used to read the CGNS file
grid.cgns that we just created is given here:
c   READ X, Y, Z GRID POINTS FROM CGNS FILE
      include 'cgnslib_f.h'
c   open CGNS file for read-only
      call cg_open_f('grid.cgns',CG_MODE_READ,index_file,ier)
      if (ier .ne. CG_OK) call cg_error_exit_f
c   we know there is only one base (real working code would check!)
      index_base=1
c   we know there is only one zone (real working code would check!)
      index_zone=1
c   get zone size (and name - although not needed here)
      call cg_zone_read_f(index_file,index_base,index_zone,zonename,
     + isize,ier)
c   lower range index
      irmin(1)=1
      irmin(2)=1
      irmin(3)=1
c   upper range index of vertices
      irmax(1)=isize(1,1)
      irmax(2)=isize(2,1)
      irmax(3)=isize(3,1)
c   read grid coordinates
      call cg_coord_read_f(index_file,index_base,index_zone,
     + 'CoordinateX',RealSingle,irmin,irmax,x,ier)
      call cg_coord_read_f(index_file,index_base,index_zone,
     + 'CoordinateY',RealSingle,irmin,irmax,y,ier)
      call cg_coord_read_f(index_file,index_base,index_zone,
     + 'CoordinateZ',RealSingle,irmin,irmax,z,ier)
c   close CGNS file
      call cg_close_f(index_file,ier)
As before, the x, y, and z arrays in this case must be dimensioned correctly: for a tri-dimensional array, (21,17,N), where N ≥ 9. (In a real working code, one would probably either (a) use one-dimensional arrays, (b) dynamically allocate appropriate memory for x, y, and z after reading isize, or else (c) pass the isize values to a subroutine and dimension a work array appropriately prior to reading.) Also note that, regardless of the precision in which the grid coordinates were written to the CGNS file (single or double), one can read them either way; the API automatically performs the translation. (The arrays x, y, and z in the code above must be declared as single precision if RealSingle is used and as double precision if RealDouble is used.) Finally, isize should be dimensioned appropriately, zonename should be declared as a character variable, and irmin and irmax should be dimensioned appropriately.
In this section, we now write a flow solution associated with
the grid from the previous section.
We assume that
we have two flow solution arrays available: static density and
static pressure. To illustrate three important options, we will
show how to write the flow solution (a) at vertices, (b) at
cell centers, and (c) at cell centers plus rind cells.
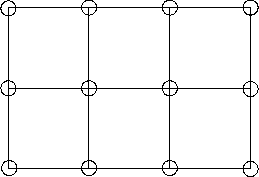
(a) Flow Solution at Vertices
The first option is illustrated schematically in 2-D in the figure below. Simply stated, a Vertex flow solution is located at the same location as the grid points. Assuming that the grid points have already been written to a CGNS file, the following FORTRAN code segment adds the flow solution at vertices:
c   WRITE FLOW SOLUTION TO EXISTING CGNS FILE
      include 'cgnslib_f.h'
c   open CGNS file for modify
      call cg_open_f('grid.cgns',CG_MODE_MODIFY,index_file,ier)
      if (ier .ne. CG_OK) call cg_error_exit_f
c   we know there is only one base (real working code would check!)
      index_base=1
c   we know there is only one zone (real working code would check!)
      index_zone=1
c   define flow solution node name (user can give any name)
      solname = 'FlowSolution'
c   create flow solution node
      call cg_sol_write_f(index_file,index_base,index_zone,solname,
     + Vertex,index_flow,ier)
c   write flow solution (user must use SIDS-standard names here)
      call cg_field_write_f(index_file,index_base,index_zone,index_flow,
     + RealDouble,'Density',r,index_field,ier)
      call cg_field_write_f(index_file,index_base,index_zone,index_flow,
     + RealDouble,'Pressure',p,index_field,ier)
c   close CGNS file
      call cg_close_f(index_file,ier)
In this code, the density (r) and pressure (p) variables must be dimensioned correctly for this particular case: for a tri-dimensional array, (21,17,N), where N ≥ 9 (see discussion in the previous section). Note that the API, knowing that the flow solution type is Vertex, automatically writes out the correct index range, corresponding with the zone's grid index range. Also note that we opened the existing CGNS file and modified it (CG_MODE_MODIFY) - we knew ahead of time that only one base and only one zone exist; a real working code would make appropriate checks. Finally, solname should be declared as a character variable and r and p must be declared as double precision variables when RealDouble type is used.
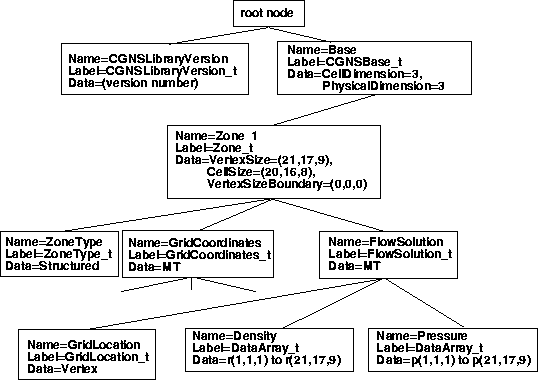
The layout of the CGNS file with the flow solution at vertices included is shown in the figure below. The three nodes under GridCoordinates_t have been left out to conserve space in the figure, but they exist as indicated by the three unconnected lines.
The vertex flow solution can be read in using the following
FORTRAN code segment (can read in as single or double precision - see
discussion in the previous section):
c   READ FLOW SOLUTION FROM CGNS FILE
      include 'cgnslib_f.h'
c   open CGNS file for read-only
      call cg_open_f('grid.cgns',CG_MODE_READ,index_file,ier)
      if (ier .ne. CG_OK) call cg_error_exit_f
c   we know there is only one base (real working code would check!)
      index_base=1
c   we know there is only one zone (real working code would check!)
      index_zone=1
c   we know there is only one FlowSolution_t (real working code would check!)
      index_flow=1
c   get zone size (and name - although not needed here)
      call cg_zone_read_f(index_file,index_base,index_zone,zonename,
     + isize,ier)
c   lower range index
      irmin(1)=1
      irmin(2)=1
      irmin(3)=1
c   upper range index - use vertex dimensions
c   checking GridLocation first (real working code would check
c   to make sure there are no Rind cells also!):
      call cg_sol_info_f(index_file,index_base,index_zone,index_flow,
     + solname,loc,ier)
      if (loc .ne. Vertex) then
        write(6,'('' Error, GridLocation must be Vertex!'')')
        stop
      end if
      irmax(1)=isize(1,1)
      irmax(2)=isize(2,1)
      irmax(3)=isize(3,1)
c   read flow solution
      call cg_field_read_f(index_file,index_base,index_zone,index_flow,
     + 'Density',RealSingle,irmin,irmax,r,ier)
      call cg_field_read_f(index_file,index_base,index_zone,index_flow,
     + 'Pressure',RealSingle,irmin,irmax,p,ier)
c   close CGNS file
      call cg_close_f(index_file,ier)
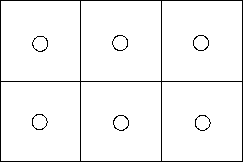
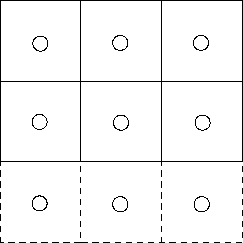
The option for outputting the flow solution at cell centers is illustrated schematically in 2-D in the figure below. The flow solutions are defined at the centers of the cells defined by the four surrounding grid points. In 3-D, the cell centers are defined by eight surrounding grid points.
c   create flow solution node (NOTE USE OF CellCenter HERE)
      call cg_sol_write_f(index_file,index_base,index_zone,solname,
     + CellCenter,index_flow,ier)
The layout of the CGNS file with the flow solution at cell centers is shown (below the FlowSolution_t node only) in the next figure. Note that the indices over which the flow solutions are written are now from (1,1,1) to (20,16,8) (contrast with the FlowSolution part of the figure with the flow solution at vertices
The FORTRAN code segment to read in the solution at cell centers
is the same as that given above for vertices, except that the section that
defines irmax is replaced by:
c   upper range index - use cell dimensions
c   checking GridLocation first (real working code would check
c   to make sure there are no Rind cells also!):
      call cg_sol_info_f(index_file,index_base,index_zone,index_flow,
     + solname,loc,ier)
      if (loc .ne. CellCenter) then
        write(6,'('' Error, GridLocation must be CellCenter!'')')
        stop
      end if
      irmax(1)=isize(1,2)
      irmax(2)=isize(2,2)
      irmax(3)=isize(3,2)
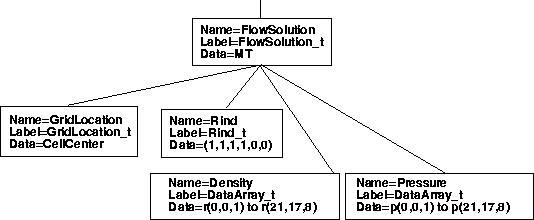
Rind data is additional flow solution data exterior to a grid, at "ghost" locations. Rind data can be associated with other GridLocation values beside CellCenter, although we only show an example using CellCenter here. Furthermore, this example is for structured grids only, for which Rind data can be defined implicitly (via indexing conventions alone). The option for outputting the flow solution at cell centers with additional rind data is illustrated schematically in 2-D in the figure below. In this diagram, we show one layer of rind cell data in the row below the grid itself. There could be rind data at other sides of the grid, or there could be more than one row at a given side.
In CGNS, the flow solution at rind cells is not stored as separate entities, but rather the flow solution range is extended to include the rind cells. For example, in the 2-D schematic of the above figure, instead of an index range of p(3,2) for pressures stored at the cell centers, the flow solution would now have an index range of p(3,0:2) or p(3,3). See the SIDS document for details.
For our 3-D example, we assume that we have one row of rind data
at 4 faces of the zone (ilo, ihi, jlo, jhi, where these
represent the low and high ends of the i and j
directions, respectively), and
no rind cells at klo or khi (at either end of the k
direction).
The code segment to write the flow solution and rind data is as
follows:
c   WRITE FLOW SOLUTION TO EXISTING CGNS FILE
      include 'cgnslib_f.h'
c   open CGNS file for modify
      call cg_open_f('grid.cgns',CG_MODE_MODIFY,index_file,ier)
      if (ier .ne. CG_OK) call cg_error_exit_f
c   we know there is only one base (real working code would check!)
      index_base=1
c   we know there is only one zone (real working code would check!)
      index_zone=1
c   define flow solution node name (user can give any name)
      solname = 'FlowSolution'
c   create flow solution node (NOTE USE OF CellCenter HERE)
      call cg_sol_write_f(index_file,index_base,index_zone,solname,
     + CellCenter,index_flow,ier)
c  go to position within tree at FlowSolution_t node
      call cg_goto_f(index_file,index_base,ier,'Zone_t',index_zone,
     + 'FlowSolution_t',index_flow,'end')
c   write rind information under FlowSolution_t node (ilo,ihi,jlo,jhi,klo,khi)
      irinddata(1)=1
      irinddata(2)=1
      irinddata(3)=1
      irinddata(4)=1
      irinddata(5)=0
      irinddata(6)=0
      call cg_rind_write_f(irinddata,ier)
c   write flow solution (user must use SIDS-standard names here)
      call cg_field_write_f(index_file,index_base,index_zone,index_flow,
     + RealDouble,'Density',r,index_field,ier)
      call cg_field_write_f(index_file,index_base,index_zone,index_flow,
     + RealDouble,'Pressure',p,index_field,ier)
c   close CGNS file
      call cg_close_f(index_file,ier)
For this case of cell center flow solution with rind data, the density (r) and pressure (p) are written to the CGNS file with the following index ranges: from i = 0 to i = 20 + 1 = 21 (or a total i length of 22), from j = 0 to j = 16 + 1 = 17 (or a total j length of 18), and from k = 1 to k = 8. The variables r and p must be dimensioned appropriately to reflect these index ranges modified by the rind values.
The layout of the CGNS file for this example (below the FlowSolution_t node only) is shown below. Compare this figure with the figures for the flow solution at vertices and for the flow solution at cell centers without rind data.
A FORTRAN code segment to read the flow solution for this example is:
c   READ FLOW SOLUTION FROM CGNS FILE
      include 'cgnslib_f.h'
c   open CGNS file for read-only
      call cg_open_f('grid.cgns',CG_MODE_READ,index_file,ier)
      if (ier .ne. CG_OK) call cg_error_exit_f
c   we know there is only one base (real working code would check!)
      index_base=1
c   we know there is only one zone (real working code would check!)
      index_zone=1
c   we know there is only one FlowSolution_t (real working code would check!)
      index_flow=1
c   get zone size (and name - although not needed here)
      call cg_zone_read_f(index_file,index_base,index_zone,zonename,
     + isize,ier)
c  go to position within tree at FlowSolution\_t node
      call cg_goto_f(index_file,index_base,ier,'Zone_t',index_zone,
     + 'FlowSolution_t',index_flow,'end')
c  read rind data
      call cg_rind_read_f(irinddata,ier)
c   lower range index
      irmin(1)=1
      irmin(2)=1
      irmin(3)=1
c   upper range index - use cell dimensions and rind info
c   checking GridLocation first:
      call cg_sol_info_f(index_file,index_base,index_zone,index_flow,
     + solname,loc,ier)
      if (loc .ne. CellCenter) then
        write(6,'('' Error, GridLocation must be CellCenter!'')')
      stop
      end if
      irmax(1)=isize(1,2)+irinddata(1)+irinddata(2)
      irmax(2)=isize(2,2)+irinddata(3)+irinddata(4)
      irmax(3)=isize(3,2)+irinddata(5)+irinddata(6)
c   read flow solution
      call cg_field_read_f(index_file,index_base,index_zone,index_flow,
     + 'Density',RealSingle,irmin,irmax,r,ier)
      call cg_field_read_f(index_file,index_base,index_zone,index_flow,
     + 'Pressure',RealSingle,irmin,irmax,p,ier)
c   close CGNS file
      call cg_close_f(index_file,ier)
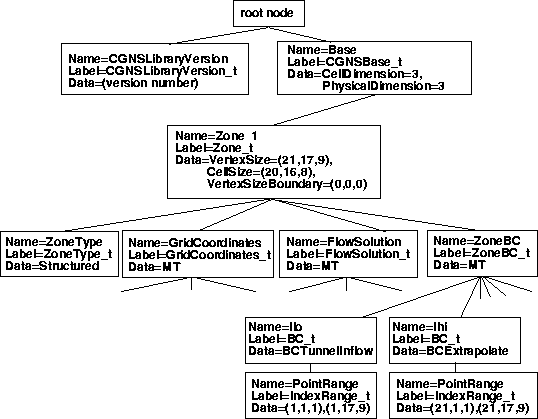
To illustrate the use of boundary conditions, we again use the
same single-zone Cartesian grid.
Referring back to the grid figure,
we wish to apply the following:
ilo - BCTunnelInflow
ihi - BCExtrapolate
jlo - BCWallInviscid
jhi - etc.
klo - etc.
khi - etc.
where BCTunnelInflow, BCExtrapolate, and
BCWallInviscid are data-name identifiers for boundary
conditions.
The complete list of boundary condition
identifiers is found in the SIDS document.
In this example, we take the approach of
using the lowest-level BC implementation allowed - see the figure
showing the general hierarchical
structure of ZoneBC_t in the SIDS
overview section.
In this section, we show two different approaches for defining the
region over which each boundary condition acts.
The first is with type PointRange, meaning that we define the
minimum and maximum points on a face that define a logically
rectangular region (this method is usable only for faces that are
capable of being defined in this way).
The second is with type PointList, which gives
the list of all the points for
which the boundary condition applies.
This latter method is generally used for any
zone whose defined region is not logically rectangular.
(a) Boundary Conditions Specifying Range
A FORTRAN code segment to write the boundary condition
information of type PointRange
to the existing CGNS file from the previous two sections
is given here:
c  WRITE BOUNDARY CONDITIONS TO EXISTING CGNS FILE
      include 'cgnslib_f.h'
c  open CGNS file for modify
      call cg_open_f('grid.cgns',CG_MODE_MODIFY,index_file,ier)
      if (ier .ne. CG_OK) call cg_error_exit_f
c  we know there is only one base (real working code would check!)
      index_base=1
c  we know there is only one zone (real working code would check!)
      index_zone=1
c   get zone size (and name - although not needed here)
      call cg_zone_read_f(index_file,index_base,index_zone,zonename,
     + isize,ier)
      ilo=1
      ihi=isize(1,1)
      jlo=1
      jhi=isize(2,1)
      klo=1
      khi=isize(3,1)
c  write boundary conditions for ilo face, defining range first
c  (user can give any name)
c  lower point of range
      ipnts(1,1)=ilo
      ipnts(2,1)=jlo
      ipnts(3,1)=klo
c  upper point of range
      ipnts(1,2)=ilo
      ipnts(2,2)=jhi
      ipnts(3,2)=khi
      call cg_boco_write_f(index_file,index_base,index_zone,'Ilo',
     + BCTunnelInflow,PointRange,2,ipnts,index_bc,ier)
c  write boundary conditions for ihi face, defining range first
c  (user can give any name)
c  lower point of range
      ipnts(1,1)=ihi
      ipnts(2,1)=jlo
      ipnts(3,1)=klo
c  upper point of range
      ipnts(1,2)=ihi
      ipnts(2,2)=jhi
      ipnts(3,2)=khi
      call cg_boco_write_f(index_file,index_base,index_zone,'Ihi',
     + BCExtrapolate,PointRange,2,ipnts,index_bc,ier)
c  write boundary conditions for jlo face, defining range first
c  (user can give any name)
c  lower point of range
      ipnts(1,1)=ilo
      ipnts(2,1)=jlo
      ipnts(3,1)=klo
c  upper point of range
      ipnts(1,2)=ihi
      ipnts(2,2)=jlo
      ipnts(3,2)=khi
      call cg_boco_write_f(index_file,index_base,index_zone,'Jlo',
     + BCWallInviscid,PointRange,2,ipnts,index_bc,ier)
      ... etc...
c  close CGNS file
      call cg_close_f(index_file,ier)
The layout of the CGNS file for this example is shown below. Four of the children nodes of ZoneBC_t are left off for clarity.
Reading the boundary conditions can also be easily accomplished using
API calls, but we do not show an example of this here.
Because there are multiple BC_t children nodes under the
ZoneBC_t node, the user must first read in the number
of children nodes
that exist, then loop through them and retrieve the information
from each.
(b) Boundary Conditions Specifying Points
The FORTRAN code segment to write the boundary conditions using
PointList is the same as that for PointRange except
that the following segment, for example,
c  write boundary conditions for ilo face, defining range first
c  (user can give any name)
      ipnts(1,1)=ilo
      ipnts(2,1)=jlo
      ipnts(3,1)=klo
      ipnts(1,2)=ilo
      ipnts(2,2)=jhi
      ipnts(3,2)=khi
      call cg_boco_write_f(index_file,index_base,index_zone,'Ilo',
     + BCTunnelInflow,PointRange,2,ipnts,index_bc,ier)
c  write boundary conditions for ilo face, defining pointlist first
c  (user can give any name)
      icount=0
      do j=jlo,jhi
        do k=klo,khi
          icount=icount+1
          ipnts(1,icount)=ilo
          ipnts(2,icount)=j
          ipnts(3,icount)=k
        enddo
      enddo
      call cg_boco_write_f(index_file,index_base,index_zone,'Ilo',
     + BCTunnelInflow,PointList,icount,ipnts,index_bc,ier)
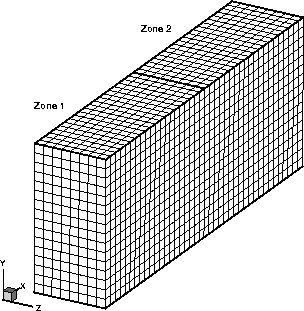
For the case of a multi-zone structured grid, each zone is handled individually in the same way as the examples in the preceding sections. However, multi-zone grids also require additional information about how the zones are connected to one another. A discussion of different types of zone-to-zone connectivity can be found in the SIDS overview section. For the example in this section, we show only a simple 1-to-1 connectivity example. We assume that we have a two-zone grid, each identical to the single zone used previously (21 × 17 × 9), except that zone 2 is offset in the x-direction by 20 units. Thus, the ilo face of zone 2 abuts the ihi face of zone 1, and each abutting point in the two zones touches a point from the neighboring zone. A picture of the grid is shown below.
The overall layout of this two-zone CGNS file is not shown here. It is similar to those shown earlier, except now there are two zones rather than one. See the SIDS overview for an additional example.
Now, 1-to-1 connectivity information must be written into
each of the zones. There are two ways to record this 1-to-1
information.
The first (specific)
method is valid only for 1-to-1 interfaces, and the regions
must be logically rectangular (because they are recorded
via PointRange and PointRangeDonor
nodes, for which only two points define
the entire region).
The second way is more general. It uses
PointList nodes in combination with PointListDonor.
(A third method, used to describe interfaces that are
not point-matched - such as mismatched or overset zones -
employs CellListDonor and InterpolantsDonor.)
Refer to the SIDS document for details
on the various methods for describing connectivity.
(a) Connectivity Using Specific 1-to-1 Method
The 1-to-1 connectivity information for the current example
can be written to a CGNS file using the following
FORTRAN code segment (assuming that all grid information has
already been written):
c  WRITE 1-TO-1 CONNECTIVITY INFORMATION TO EXISTING CGNS FILE
      include 'cgnslib_f.h'
c  open CGNS file for modify
      call cg_open_f('grid.cgns',CG_MODE_MODIFY,index_file,ier)
      if (ier .ne. CG_OK) call cg_error_exit_f
c  we know there is only one base (real working code would check!)
      index_base=1
c   get number of zones (should be 2 for our case)
      call cg_nzones_f(index_file,index_base,nzone,ier)
c   loop over zones to get zone sizes and names
      do index_zone=1,nzone
        call cg_zone_read_f(index_file,index_base,index_zone,
     +    zonename(index_zone),isize,ier)
        ilo(index_zone)=1
        ihi(index_zone)=isize(1,1)
        jlo(index_zone)=1
        jhi(index_zone)=isize(2,1)
        klo(index_zone)=1
        khi(index_zone)=isize(3,1)
      enddo
c   loop over zones again
      do index_zone=1,nzone
c   set up index ranges
        if (index_zone .eq. 1) then
          donorname=zonename(2)
c   lower point of receiver range
          ipnts(1,1)=ihi(1)
          ipnts(2,1)=jlo(1)
          ipnts(3,1)=klo(1)
c   upper point of receiver range
          ipnts(1,2)=ihi(1)
          ipnts(2,2)=jhi(1)
          ipnts(3,2)=khi(1)
c   lower point of donor range
          ipntsdonor(1,1)=ilo(2)
          ipntsdonor(2,1)=jlo(2)
          ipntsdonor(3,1)=klo(2)
c   upper point of donor range
          ipntsdonor(1,2)=ilo(2)
          ipntsdonor(2,2)=jhi(2)
          ipntsdonor(3,2)=khi(2)
        else
          donorname=zonename(1)
c   lower point of receiver range
          ipnts(1,1)=ilo(2)
          ipnts(2,1)=jlo(2)
          ipnts(3,1)=klo(2)
c   upper point of receiver range
          ipnts(1,2)=ilo(2)
          ipnts(2,2)=jhi(2)
          ipnts(3,2)=khi(2)
c   lower point of donor range
          ipntsdonor(1,1)=ihi(1)
          ipntsdonor(2,1)=jlo(1)
          ipntsdonor(3,1)=klo(1)
c   upper point of donor range
          ipntsdonor(1,2)=ihi(1)
          ipntsdonor(2,2)=jhi(1)
          ipntsdonor(3,2)=khi(1)
        end if
c   set up Transform
        itranfrm(1)=1
        itranfrm(2)=2
        itranfrm(3)=3
c   write 1-to-1 info (user can give any name)
        call cg_1to1_write_f(index_file,index_base,index_zone,
     +    'Interface',donorname,ipnts,ipntsdonor,itranfrm,
     +    index_conn,ier)
      enddo
c  close CGNS file
      call cg_close_f(index_file,ier)
Using a more general method, for which each connectivity pair is
listed (rather than ranges),
the connectivity information for the current example
can be written to a CGNS file using the following
FORTRAN code segment:
c  WRITE GENERAL CONNECTIVITY INFORMATION TO EXISTING CGNS FILE
      include 'cgnslib_f.h'
c  open CGNS file for modify
      call cg_open_f('grid.cgns',CG_MODE_MODIFY,index_file,ier)
      if (ier .ne. CG_OK) call cg_error_exit_f
c  we know there is only one base (real working code would check!)
      index_base=1
c   get number of zones (should be 2 for our case)
      call cg_nzones_f(index_file,index_base,nzone,ier)
c   loop over zones to get zone sizes and names
      do index_zone=1,nzone
        call cg_zone_read_f(index_file,index_base,index_zone,
     +    zonename(index_zone),isize,ier)
        ilo(index_zone)=1
        ihi(index_zone)=isize(1,1)
        jlo(index_zone)=1
        jhi(index_zone)=isize(2,1)
        klo(index_zone)=1
        khi(index_zone)=isize(3,1)
      enddo
c   loop over zones again
      do index_zone=1,nzone
c   set up point lists
        if (index_zone .eq. 1) then
          icount=0
          do j=jlo(index_zone),jhi(index_zone)
            do k=klo(index_zone),khi(index_zone)
              icount=icount+1
              ipnts(1,icount)=ihi(1)
              ipnts(2,icount)=j
              ipnts(3,icount)=k
              ipntsdonor(1,icount)=ilo(2)
              ipntsdonor(2,icount)=j
              ipntsdonor(3,icount)=k
            enddo
          enddo
          donorname=zonename(2)
        else
          icount=0
          do j=jlo(index_zone),jhi(index_zone)
            do k=klo(index_zone),khi(index_zone)
              icount=icount+1
              ipnts(1,icount)=ilo(2)
              ipnts(2,icount)=j
              ipnts(3,icount)=k
              ipntsdonor(1,icount)=ihi(1)
              ipntsdonor(2,icount)=j
              ipntsdonor(3,icount)=k
            enddo
          enddo
          donorname=zonename(1)
        end if
c   write integer connectivity info (user can give any name)
        call cg_conn_write_f(index_file,index_base,index_zone,
     +    'GenInterface',Vertex,Abutting1to1,PointList,icount,ipnts,
     +    donorname,Structured,PointListDonor,Integer,icount,
     +    ipntsdonor,index_conn,ier)
      enddo
c  close CGNS file
      call cg_close_f(index_file,ier)
This section gives several unstructured grid examples. The user should already be familiar with the information covered in the previous section, which gives structured grid examples. Because much of the organization of the CGNS files is identical for both grid types, many of the ideas covered in the structured grid section are not repeated again here.
This example uses the exact single-zone grid
shown earlier. However, it is now written
as an unstructured grid, which is made up of a series
of 6-sided elements (cubes in this case).
A FORTRAN code segment that uses API calls to write this grid
to a CGNS file called grid.cgns is shown here (note that it
does not matter
how the nodes are ordered in an unstructured zone, but in this
example they are ordered sequentially for simplicity of presentation):
c  WRITE X, Y, Z GRID POINTS TO CGNS FILE
      include 'cgnslib_f.h'
c  open CGNS file for write
      call cg_open_f('grid.cgns',CG_MODE_WRITE,index_file,ier)
      if (ier .ne. CG_OK) call cg_error_exit_f
c  create base (user can give any name)
      basename='Base'
      icelldim=3
      iphysdim=3
      call cg_base_write_f(index_file,basename,icelldim,iphysdim,
     + index_base,ier)
c  define zone name (user can give any name)
      zonename = 'Zone  1'
c  we use the same grid as for the structured example with ni=21,
c  nj=17, nk=9.  The variables ni, nj, and nk are still used later,
c  for convenience when numbering the unstructured grid elements.
      ni=21
      nj=17
      nk=9
c  vertex size (21*17*9 = 3213)
      isize(1,1)=3213
c  cell size (20*16*8 = 2560)
      isize(1,2)=2560
c  boundary vertex size (zero if elements not sorted)
      isize(1,3)=0
c  create zone
      call cg_zone_write_f(index_file,index_base,zonename,isize,
     + Unstructured,index_zone,ier)
c  write grid coordinates (user must use SIDS-standard names here)
      call cg_coord_write_f(index_file,index_base,index_zone,RealDouble,
     + 'CoordinateX',x,index_coord,ier)
      call cg_coord_write_f(index_file,index_base,index_zone,RealDouble,
     + 'CoordinateY',y,index_coord,ier)
      call cg_coord_write_f(index_file,index_base,index_zone,RealDouble,
     + 'CoordinateZ',z,index_coord,ier)
c  set element connectivity:
c  do all the HEX_8 elements (this part is mandatory):
c  maintain SIDS-standard ordering
      ielem_no=0
c  index no of first element
      nelem_start=1
      do k=1,nk-1
        do j=1,nj-1
          do i=1,ni-1
            ielem_no=ielem_no+1
c  in this example, due to the order in the node numbering, the
c  hexahedral elements can be reconstructed using the following
c  relationships:
            ifirstnode=i+(j-1)*ni+(k-1)*ni*nj
            ielem(1,ielem_no)=ifirstnode
            ielem(2,ielem_no)=ifirstnode+1
            ielem(3,ielem_no)=ifirstnode+1+ni
            ielem(4,ielem_no)=ifirstnode+ni
            ielem(5,ielem_no)=ifirstnode+ni*nj
            ielem(6,ielem_no)=ifirstnode+ni*nj+1
            ielem(7,ielem_no)=ifirstnode+ni*nj+1+ni
            ielem(8,ielem_no)=ifirstnode+ni*nj+ni
          enddo
        enddo
      enddo
c  index no of last element (=2560)
      nelem_end=ielem_no
c  unsorted boundary elements
      nbdyelem=0
c  write HEX_8 element connectivity (user can give any name)
      call cg_section_write_f(index_file,index_base,index_zone,
     +  'Elem',HEXA_8,nelem_start,nelem_end,nbdyelem,ielem,
     +  index_section,ier)
c  close CGNS file
      call cg_close_f(index_file,ier)
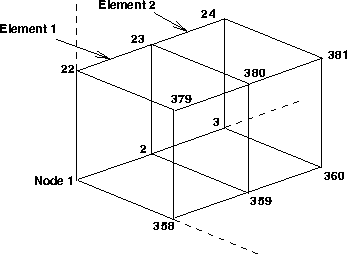
Note that for unstructured zones, the index dimension is always 1 (because only one index value is required to identify a position in the mesh), so the isize array contains the total vertex size, cell size, and boundary vertex size for the zone. In this example, the ielem array must be dimensioned exactly as (8,N), where N is greater than or equal to the total number of elements. The node points that lie in the lower left corner of the grid are shown schematically for two elements in the figure below. Here it can be seen, for example, that node numbers 1, 2, 23, 22, 358, 359, 380, and 379 make up element 1.
The overall layout of the CGNS file created by the above code segment is shown below. The nodes for y and z are left off due to lack of space. Compare this figure with the layout for the structured version of this grid.
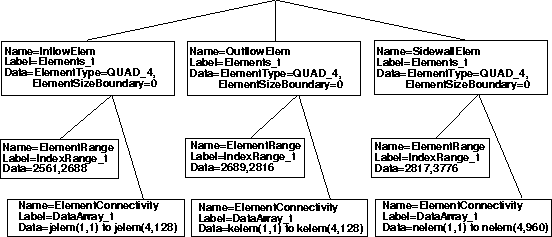
For unstructured zones, the user may also wish to separately list the boundary elements in the CGNS file. This may be useful for assigning boundary conditions, as we will show later. In the current example, assume that the user wishes to assign three different types of boundary conditions: inflow at one end, outflow at the other end, and side walls on the four faces in-between. To accomplish this, it would be helpful to have three additional Elements_t nodes in the CGNS file, each of which lists the corresponding faces as elements (QUAD_4 in this case).
A FORTRAN code segment that accomplishes a part of this is given here. It may
be a part of the same code (above) that defined the grid and HEXA_8
connectivity.
c  do boundary (QUAD) elements (this part is optional,
c  but you must do it if you eventually want to define BCs
c  at element faces rather than at nodes):
c  INFLOW:
      ielem_no=0
c  index no of first element
      nelem_start=nelem_end+1
      i=1
      do k=1,nk-1
        do j=1,nj-1
          ielem_no=ielem_no+1
          ifirstnode=i+(j-1)*ni+(k-1)*ni*nj
          jelem(1,ielem_no)=ifirstnode
          jelem(2,ielem_no)=ifirstnode+ni*nj
          jelem(3,ielem_no)=ifirstnode+ni*nj+ni
          jelem(4,ielem_no)=ifirstnode+ni
        enddo
      enddo
c  index no of last element
      nelem_end=nelem_start+ielem_no-1
c  write QUAD element connectivity for inflow face (user can give any name)
      call cg_section_write_f(index_file,index_base,index_zone,
     +  'InflowElem',QUAD_4,nelem_start,nelem_end,nbdyelem,
     +  jelem,index_section,ier)
c  OUTFLOW:
      ... etc...
In this example, the jelem array must be dimensioned exactly as (4,N), where N is greater than or equal to the total number of elements. Note that the nelem_start and nelem_end range is defined subsequent to the range of any other elements (i.e., the HEXA_8 elements) already defined in this zone. In other words, all elements in a given zone must have a different number.
The layout of the CGNS file in this case is exactly the same as that shown in the previous figure, except that there are now three additional Elements_t nodes under Zone_t. These are shown separately below.
To add a flow solution to an unstructured zone, the procedure is identical to that for a structured zone. However, the Rind field for unstructured grids indicates additional points rather than planes. Example of Rind capability for unstructured grids is not covered here. Considering the vertex and cell-center examples shown previously, the only difference for unstructured zones is that all arrays are one-dimensional (there is only one index), as opposed to three indices for 3-D structured arrays. A vertex solution indicates that the solution is stored at vertices or nodes. In the above example, there would be lists of 3213 data array items per solution variable. A cell center solution implies that the solution is stored at the center of each element. In the above example, there would be lists of 2560 data array items per solution variable.
The overall layout of the CGNS file is the same as that shown previously, except that there would also be a FlowSolution_t node under Zone 1, and this node would have the children nodes GridLocation, Density, and Pressure.
When writing boundary conditions to a CGNS file for an unstructured zone, one can follow the same general procedure outlined previously for a structured zone. In other words, the boundary conditions can be defined for point ranges or for individual points, where the points refer to nodes (vertices) of the grid. Coding would be essentially the same as that presented before, except that the points and/or ranges are now one-dimensional (there is only one index), as opposed to three indices for 3-D structured arrays.
However, for unstructured zones this is generally not the recommended method. Usually, for unstructured zones one has also already defined additional Elements_t nodes that define the boundary face elements. Therefore, it is best for the boundary conditions to be associated with these elements rather than with the nodes.
Because this concept is quite different from what was done with the
structured zone
earlier, we illustrate it with an example.
We earlier showed
how to create the additional
Elements_t nodes defining the boundary faces. The face-center
boundary conditions now can be written using the following code segment.
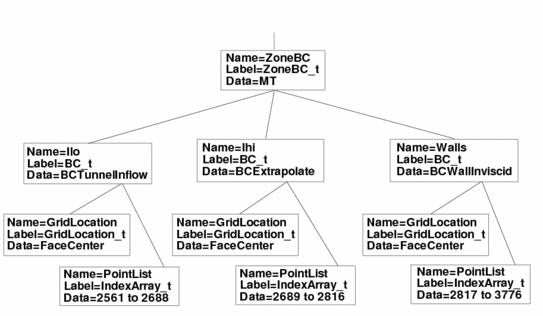
c  WRITE BOUNDARY CONDITIONS TO EXISTING CGNS FILE
      include 'cgnslib_f.h'
c  open CGNS file for modify
      call cg_open_f('grid.cgns',CG_MODE_MODIFY,index_file,ier)
      if (ier .ne. CG_OK) call cg_error_exit_f
c  we know there is only one base (real working code would check!)
      index_base=1
c  we know there is only one zone (real working code would check!)
      index_zone=1
c  we know that for the unstructured zone, the following face elements
c  have been defined as inflow (real working code would check!):
      nelem_start=2561
      nelem_end=2688
      icount=0
      do n=nelem_start,nelem_end
        icount=icount+1
        ipnts(icount)=n
      enddo
c  write boundary conditions for ilo face
      call cg_boco_write_f(index_file,index_base,index_zone,'Ilo',
     + BCTunnelInflow,PointList,icount,ipnts,index_bc,ier)
c  we know that for the unstructured zone, the following face elements
c  have been defined as outflow (real working code would check!):
      nelem_start=2689
      nelem_end=2816
      icount=0
      do n=nelem_start,nelem_end
        icount=icount+1
        ipnts(icount)=n
      enddo
c  write boundary conditions for ihi face
      call cg_boco_write_f(index_file,index_base,index_zone,'Ihi',
     + BCExtrapolate,PointList,icount,ipnts,index_bc,ier)
c  we know that for the unstructured zone, the following face elements
c  have been defined as walls (real working code would check!):
      nelem_start=2817
      nelem_end=3776
      icount=0
      do n=nelem_start,nelem_end
        icount=icount+1
        ipnts(icount)=n
      enddo
c  write boundary conditions for wall faces
      call cg_boco_write_f(index_file,index_base,index_zone,'Walls',
     + BCWallInviscid,PointList,icount,ipnts,index_bc,ier)
c
c  the above are all face-center locations for the BCs - must indicate this,
c  otherwise Vertices will be assumed!
      do ibc=1,index_bc
c  (the following call positions you in BC_t - it assumes there
c  is only one Zone_t and one ZoneBC_t - real working code would check!)
        call cg_goto_f(index_file,index_base,ier,'Zone_t',1,
     +    'ZoneBC_t',1,'BC_t',ibc,'end')
        call cg_gridlocation_write_f(FaceCenter,ier)
      enddo
c  close CGNS file
      call cg_close_f(index_file,ier)
Note that we assume here that we know in advance the element numbers associated with each of the boundaries. We have written these element numbers as a PointList, but, because they are in order, we could just as easily have used PointRange instead. In that case, only two ipnts values would be needed, equal to nelem_start and nelem_end, and icount would be 2. Finally, note that the GridLocation_t node under BC_t must be written using the API call cg_goto_f (which positions you correctly in the tree) followed by cg_gridlocation_write_f.
Note that the use of ElementList and ElementRange (recommended in previous versions of CGNS) has been deprecated and should not be used in new code. These are still accepted, but will be internally replaced with the appropriate values of PointList/PointRange and GridLocation_t.
A portion of the layout of the CGNS file for the ZoneBC_t node and its children is shown below. The ZoneBC_t node lies directly under Zone_t.
The three figures, showing the general layout of a CGNS file for an unstructured grid, the layout of additional Elements_t boundary face nodes, and the layout at and below the ZoneBC_t node, taken together, constitute the entire layout of the file.