Userguide
A concise introduction to many of the most commonly-used features of CGNS, with coding examples using the Mid-Level Library to write and read simple files containing CGNS databases.
This User’s Guide is intended as a tutorial: light in content, but heavy in examples, advice, and guidelines. Original Version of this User’s Guide was also published as NASA/TM-2001-211236, October 2001.
All examples of source code discussed in this Guide are available from github repository , as a complement to the document itself. We strongly recommend that you download these examples.
Note
- Questions and comments on this guide are welcome and should be directed to:
- Chris RumseyMail Stop 128NASA Langley Research CenterHampton, VA 23681-2199(757) 864-2165e-mail: c<dot>l<dot>rumsey<at>larc<dot>nasa<dot>gov
The rules and conventions governing how the nodes in a CGNS file are organized, including their names and labels, are specified in the SIDS document, with additional details in the SIDS File Mapping Manual. These documents also specify in detail how CFD information is to be stored within the nodes in a standardized fashion so that other users can easily access and read it. When a CGNS file strictly adheres to the rules given in the SIDS document, it is said to be “SIDS-compliant.” A CGNS file must be SIDS-compliant in order for other users to be able to properly interpret it. A brief overview of the most commonly used aspects of the SIDS is included in the current document.
However, to get started with CGNS, it is not necessary for the user to fully understand the SIDS document. The mid-level, or API calls have been created to aid users in writing and reading CGNS files that are SIDS-compliant. [There are currently two levels of programming access to CGNS. The lowest level consists of CGIO-level calls which interact directly with the database manager. These calls perform the most basic functions, such as creating a child node, writing data, reading data, etc. However, these low-level calls know nothing at all about the SIDS, so the user is responsible for putting data in the correct place, to make the CGNS file SIDS-compliant. The mid-level, or API calls, which always begin with the characters “cg_”, were written with knowledge of the SIDS. Therefore, it is easier to adhere to the SIDS standards when writing a CGNS file using the API calls, and some checks for SIDS-compliance are also made by the API calls when accessing a CGNS file (SIDS compliance is not guaranteed, but the API calls go a long way toward facilitating it). The API calls also drastically shorten the calling sequences necessary to perform many of the functions needed to create and read CGNS files.] Using the API, most CFD data of interest to the majority of users can be written into or read from a CGNS file very easily with only an elementary understanding of the SIDS.
In the following sections, we give detailed instructions on how to create typical CGNS files or portions of files. These instructions are given in the form of simple examples. They make use of the mid-level API calls, although not all API calls are covered in this document (a complete list of available API calls can be found in the Mid-Level Library document). We recommend that the user read through the examples in this section in order, because some information in the later sections depends on being familiar with information given in the earlier ones. Hopefully, users should be able to easily extend these simple examples to their own applications. Additional applications are covered in a later section.
Also note that we have delayed the discussion of units and nondimensionalization until later. For now, all examples simply store and retrieve pure numbers, and it is assumed that the user knows what the dimensions or nondimensionalizations of each variable are.
Structured grid
This first section gives several structured grid examples, whereas the following section gives unstructured grid examples. However, we recommend that the current section be read first, in its entirety, even if the user is only interested in unstructured grid applications. This is because much of the organization of the CGNS files is identical for both grid types, and later sections of this document assume that the user is familiar with information given in earlier sections.
Single-zone structured grid
This first example is for a very simple 3-D Cartesian grid of size 21 × 17 × 9. The grid points themselves are created using the following FORTRAN code snippet:
do k=1,nk
   do j=1,nj
      do i=1,ni
         x(i,j,k)=float(i-1)
         y(i,j,k)=float(j-1)
         z(i,j,k)=float(k-1)
      enddo
   enddo
enddo
where ni=21, nj=17, and nk=9. A picture of the grid is shown below.
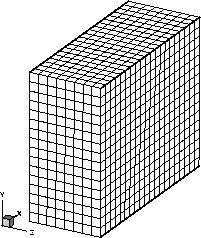
Simple Cartesian structured grid.
A complete FORTRAN code that creates this grid and uses API calls to write it to a CGNS file called grid.cgns is shown here (note that a FORTRAN line continuation is denoted by a +). This (and all later) coded examples are available from the CGNS site external link, and summarized in this document in the section Example Computer Codes.
program write_grid_str
!
!   Creates simple 3-D structured grid and writes it to a
!   CGNS file.
!
!   This program uses the fortran convention that all
!   variables beginning with the letters i-n are integers,
!   by default, and all others are real
!
!   Example compilation for this program is (change paths!):
!
!   ifort -I ../CGNS_CVS/cgnslib -c write_grid_str.f
!   ifort -o write_grid_str write_grid_str.o -L ../CGNS_CVS/cgnslib/LINUX -lcgns
!
!   (../CGNS_CVS/cgnslib/LINUX/ is the location where the compiled
!   library libcgns.a is located)
!
!   cgns.mod and cgnstypes_f03.h files must be located in directory specified by -I during compile:
      use cgns
      implicit none
#include "cgnstypes_f03.h"
!
!   dimension statements (note that tri-dimensional arrays
!   x,y,z must be dimensioned exactly as (21,17,N) (N>=9)
!   for this particular case or else they will be written to
!   the CGNS file incorrectly!  Other options are to use 1-D
!   arrays, use dynamic memory, or pass index values to a
!   subroutine and dimension exactly there):
      real*8 x(21,17,9),y(21,17,9),z(21,17,9)
      dimension isize(3,3)
      character basename*32,zonename*32
!
!   create gridpoints for simple example:
      ni=21
      nj=17
      nk=9
      do k=1,nk
        do j=1,nj
          do i=1,ni
            x(i,j,k)=float(i-1)
            y(i,j,k)=float(j-1)
            z(i,j,k)=float(k-1)
          enddo
        enddo
      enddo
      write(6,'('' created simple 3-D grid points'')')
!
!   WRITE X, Y, Z GRID POINTS TO CGNS FILE
!   open CGNS file for write
      call cg_open_f('grid.cgns',CG_MODE_WRITE,index_file,ier)
      if (ier .ne. CG_OK) call cg_error_exit_f
!   create base (user can give any name)
      basename='Base'
      icelldim=3
      iphysdim=3
      call cg_base_write_f(index_file,basename,icelldim,iphysdim,
     + index_base,ier)
!   define zone name (user can give any name)
      zonename = 'Zone  1'
!   vertex size
      isize(1,1)=21
      isize(2,1)=17
      isize(3,1)=9
!   cell size
      isize(1,2)=isize(1,1)-1
      isize(2,2)=isize(2,1)-1
      isize(3,2)=isize(3,1)-1
!   boundary vertex size (always zero for structured grids)
      isize(1,3)=0
      isize(2,3)=0
      isize(3,3)=0
!   create zone
      call cg_zone_write_f(index_file,index_base,zonename,isize,
     + Structured,index_zone,ier)
!   write grid coordinates (user must use SIDS-standard names here)
      call cg_coord_write_f(index_file,index_base,index_zone,RealDouble,
     + 'CoordinateX',x,index_coord,ier)
      call cg_coord_write_f(index_file,index_base,index_zone,RealDouble,
     + 'CoordinateY',y,index_coord,ier)
      call cg_coord_write_f(index_file,index_base,index_zone,RealDouble,
     + 'CoordinateZ',z,index_coord,ier)
!   close CGNS file
      call cg_close_f(index_file,ier)
      write(6,'('' Successfully wrote grid to file grid.cgns'')')
      stop
      end
There are several items to note regarding this code. Whenever a new entity is created using the API, an integer index is returned. This index is used in subsequent API calls to refer to the entity. For example, the above call to cg_open_f, which opens the file grid.cgns, assigns to this entity the index index_file. This same index_file is used to identify this entity in subsequent calls. Similarly, cg_base_write_f assigns an index index_base to the base, cg_zone_write_f assigns an index index_zone to the zone, and cg_coord_write_f assigns an index index_coord to each coordinate.
For FORTRAN code, an include statement pointing to cgnslib_f.h must be present. (The cgnslib_f.h file comes with the CGNS software.) Also, it is imperative that the x, y, and z arrays be dimensioned exactly as (21,17,N), where N ≥ 9 (or else as a one-dimensional array of at least size 21*17*9) for this particular example; this is because the cg_coord_write_f routine writes the first 21*17*9 values contained in the array as it is stored in memory. If x, y, and z are tri-dimensional arrays and the first two indices are dimensioned larger than 21 and 17, respectively, then incorrect values will be placed in the CGNS file. In a real working code, one would probably either (a) use one-dimensional arrays, (b) dynamically allocate appropriate memory for x, y, and z, or else (c) pass the index values to a subroutine and write via an appropriately dimensioned work array.
In this case, the cell dimension (icelldim) is 3 (because the grid is made up of volume cells), and the physical dimension (iphysdim) is 3 (because 3 coordinates define 3-D). (See the section Overview of the SIDS for a more detailed description.) The isize array contains the vertex size, cell size, and boundary vertex size for each index direction. For a 3-D structured grid, the index dimension is always the same as the cell dimension, so this means there are 3 vertex sizes, 3 cell sizes, and 3 boundary vertex sizes (one each for the i, j, and k directions). For structured grids, the cell size is always one less than the corresponding vertex size, and the boundary vertex size has no meaning and is always zero. When writing the grid coordinates, the user must use SIDS-standard names. For example, x, y, and z coordinates must be named CoordinateX, CoordinateY, and CoordinateZ, respectively. Other standard names exist for other possible choices. Finally, basename and zonename must be declared as character strings, and the integer array isize must be dimensioned appropriately.
The grid coordinate arrays can be written in single or double precision. The desired data type is communicated to the API using the keywords RealSingle or RealDouble. The user must insure that the data type transmitted to the API is consistent with the the one used in declaring the coordinates arrays. When it is compiled, the code must also link to the compiled CGNS library libcgns.a. Instructions for compiling the CGNS library are given in README files that come with the CGNS software.
A complete code written in C that performs the same task of creating grid coordinates and writing them to a CGNS file is given here.
/*   Program write_grid_str.c    */
/*
Creates simple 3-D structured grid and writes it to a
CGNS file.

Example compilation for this program is (change paths!):

cc -I ../CGNS_CVS/cgnslib -c write_grid_str.c
cc -o write_grid_str_c write_grid_str.o -L ../CGNS_CVS/cgnslib/LINUX -lcgns

(../CGNS_CVS/cgnslib/LINUX/ is the location where the compiled
library libcgns.a is located)
*/

#include <stdio.h>
#include <string.h>
/* cgnslib.h file must be located in directory specified by -I during compile: */
#include "cgnslib.h"

#if CG_BUILD_SCOPE
#  error enumeration scoping needs to be off
#endif

int main()
{
/*
   dimension statements (note that tri-dimensional arrays
   x,y,z must be dimensioned exactly as [N][17][21] (N>=9)
   for this particular case or else they will be written to
   the CGNS file incorrectly!  Other options are to use 1-D
   arrays, use dynamic memory, or pass index values to a
   subroutine and dimension exactly there):
*/
   double x[9][17][21],y[9][17][21],z[9][17][21];
   cgsize_t isize[3][3];
   int ni,nj,nk,i,j,k;
   int index_file,icelldim,iphysdim,index_base;
   int index_zone,index_coord;
   char basename[33],zonename[33];

/* create gridpoints for simple example: */
   ni=21;
   nj=17;
   nk=9;
   for (k=0; k < nk; ++k)
   {
     for (j=0; j < nj; ++j)
     {
       for (i=0; i < ni; ++i)
       {
         x[k][j][i]=i;
         y[k][j][i]=j;
         z[k][j][i]=k;
       }
     }
   }
   printf("\ncreated simple 3-D grid points");

/* WRITE X, Y, Z GRID POINTS TO CGNS FILE */
/* open CGNS file for write */
   if (cg_open("grid_c.cgns",CG_MODE_WRITE,&index_file)) cg_error_exit();
/* create base (user can give any name) */
   strcpy(basename,"Base");
   icelldim=3;
   iphysdim=3;
   cg_base_write(index_file,basename,icelldim,iphysdim,&index_base);
/* define zone name (user can give any name) */
   strcpy(zonename,"Zone  1");
/* vertex size */
   isize[0][0]=21;
   isize[0][1]=17;
   isize[0][2]=9;
/* cell size */
   isize[1][0]=isize[0][0]-1;
   isize[1][1]=isize[0][1]-1;
   isize[1][2]=isize[0][2]-1;
/* boundary vertex size (always zero for structured grids) */
   isize[2][0]=0;
   isize[2][1]=0;
   isize[2][2]=0;
/* create zone */
   cg_zone_write(index_file,index_base,zonename,*isize,Structured,&index_zone);
/* write grid coordinates (user must use SIDS-standard names here) */
   cg_coord_write(index_file,index_base,index_zone,RealDouble,"CoordinateX",
       x,&index_coord);
   cg_coord_write(index_file,index_base,index_zone,RealDouble,"CoordinateY",
       y,&index_coord);
   cg_coord_write(index_file,index_base,index_zone,RealDouble,"CoordinateZ",
       z,&index_coord);
/* close CGNS file */
   cg_close(index_file);
   printf("\nSuccessfully wrote grid to file grid_c.cgns\n");
   return 0;
}
Note
In the C-code, the “.h” file that must be included is called cgnslib.h.
From now on, all codes will be given in FORTRAN only. The C-equivalent calls are similar, as demonstrated above. Also, from now on, complete code will not be shown, but rather only code segments, in order to save space. However, complete codes can be accessed from the CGNS site external link.
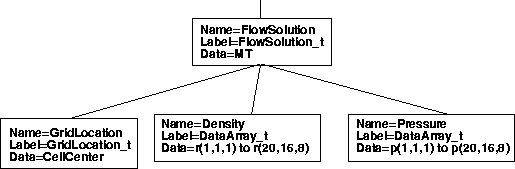
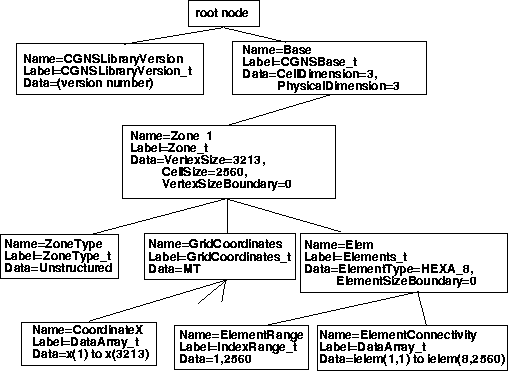
The CGNS file grid.cgns that is created by the code above is a binary file that, internally, possesses the tree-like structure shown below. Each tree node has a name, a label, and may or may not contain data. In the example in the figure, all the nodes contain data except for the GridCoordinates node, for which MT indicates no data.
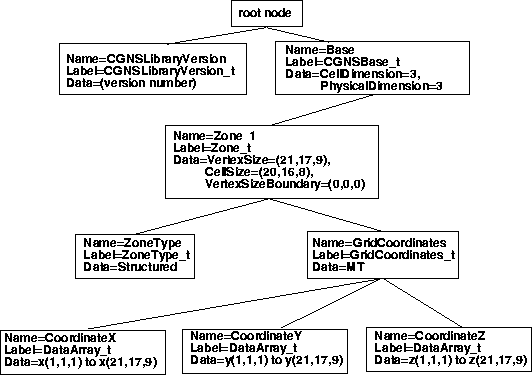
Layout of CGNS file for simple Cartesian structured grid.
However, the user really does not need to know the full details of the tree-like structure in this case. The API has automatically created a SIDS-compliant CGNS file! Now, the user can just as easily read the CGNS file using the API. The FORTRAN code segment used to read the CGNS file grid.cgns that we just created is given here:
!   READ X, Y, Z GRID POINTS FROM CGNS FILE
      use cgns
      implicit none
!   open CGNS file for read-only
      call cg_open_f('grid.cgns',CG_MODE_READ,index_file,ier)
      if (ier .ne. CG_OK) call cg_error_exit_f
!   we know there is only one base (real working code would check!)
      index_base=1
!   we know there is only one zone (real working code would check!)
      index_zone=1
!   get zone size (and name - although not needed here)
      call cg_zone_read_f(index_file,index_base,index_zone,zonename,
     + isize,ier)
!   lower range index
      irmin(1)=1
      irmin(2)=1
      irmin(3)=1
!   upper range index of vertices
      irmax(1)=isize(1,1)
      irmax(2)=isize(2,1)
      irmax(3)=isize(3,1)
!   read grid coordinates
      call cg_coord_read_f(index_file,index_base,index_zone,
     + 'CoordinateX',RealSingle,irmin,irmax,x,ier)
      call cg_coord_read_f(index_file,index_base,index_zone,
     + 'CoordinateY',RealSingle,irmin,irmax,y,ier)
      call cg_coord_read_f(index_file,index_base,index_zone,
     + 'CoordinateZ',RealSingle,irmin,irmax,z,ier)
!   close CGNS file
      call cg_close_f(index_file,ier)
Note that this FORTRAN coding is very rudimentary. It assumes that we know that there is only one base and one zone. In a real working code, one should check the numbers in the file, and either allow for the possibility of multiple bases or zones, or explicitly disallow it. Also, this coding implicitly assumes that the grid.cgns file is a 3-D structured grid (cell dimension = physical dimension = 3). In a real working code, one should check to make sure that this is true, or else allow for other possibilities. One should also check to make sure the zone type is Structured if this is the type expected.
As before, the x, y, and z arrays in this case must be dimensioned correctly: for a tri-dimensional array, (21,17,N), where N ≥ 9. (In a real working code, one would probably either (a) use one-dimensional arrays, (b) dynamically allocate appropriate memory for x, y, and z after reading isize, or else (c) pass the isize values to a subroutine and dimension a work array appropriately prior to reading.) Also note that, regardless of the precision in which the grid coordinates were written to the CGNS file (single or double), one can read them either way; the API automatically performs the translation. (The arrays x, y, and z in the code above must be declared as single precision if RealSingle is used and as double precision if RealDouble is used.) Finally, isize should be dimensioned appropriately, zonename should be declared as a character variable, and irmin and irmax should be dimensioned appropriately.
Single-Zone Structured Grid and Flow Solution
In this section, we now write a flow solution associated with the grid from the previous section. We assume that we have two flow solution arrays available: static density and static pressure. To illustrate three important options, we will show how to write the flow solution (a) at vertices, (b) at cell centers, and (c) at cell centers plus rind cells.
(a) Flow Solution at Vertices
The first option is illustrated schematically in 2-D in the figure below. Simply stated, a Vertex flow solution is located at the same location as the grid points. Assuming that the grid points have already been written to a CGNS file, the following FORTRAN code segment adds the flow solution at vertices:
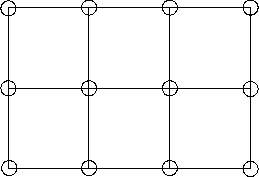
Schematic showing location (circles) of Vertex flow solution relative to grid.
!   WRITE FLOW SOLUTION TO EXISTING CGNS FILE
      use cgns
!   open CGNS file for modify
      call cg_open_f('grid.cgns',CG_MODE_MODIFY,index_file,ier)
      if (ier .ne. CG_OK) call cg_error_exit_f
!   we know there is only one base (real working code would check!)
      index_base=1
!   we know there is only one zone (real working code would check!)
      index_zone=1
!   define flow solution node name (user can give any name)
      solname = 'FlowSolution'
!   create flow solution node
      call cg_sol_write_f(index_file,index_base,index_zone,solname,
     + Vertex,index_flow,ier)
!   write flow solution (user must use SIDS-standard names here)
      call cg_field_write_f(index_file,index_base,index_zone,index_flow,
     + RealDouble,'Density',r,index_field,ier)
      call cg_field_write_f(index_file,index_base,index_zone,index_flow,
     + RealDouble,'Pressure',p,index_field,ier)
!   close CGNS file
      call cg_close_f(index_file,ier)
Note
In this code, the density (r) and pressure (p) variables must be dimensioned correctly for this particular case: for a tri-dimensional array, (21,17,N), where N ≥ 9 (see discussion in the previous section). Note that the API, knowing that the flow solution type is Vertex, automatically writes out the correct index range, corresponding with the zone’s grid index range. Also note that we opened the existing CGNS file and modified it (CG_MODE_MODIFY) - we knew ahead of time that only one base and only one zone exist; a real working code would make appropriate checks. Finally, solname should be declared as a character variable and r and p must be declared as double precision variables when RealDouble type is used.
The layout of the CGNS file with the flow solution at vertices included is shown in the figure below. The three nodes under GridCoordinates_t have been left out to conserve space in the figure, but they exist as indicated by the three unconnected lines.
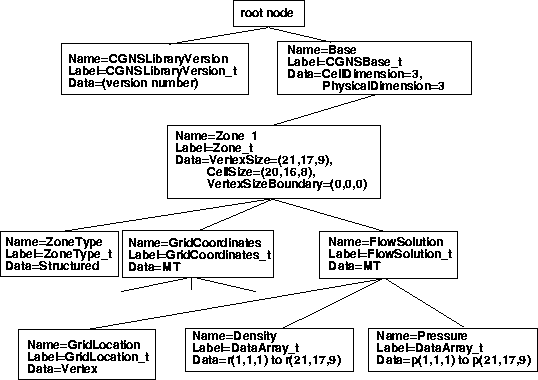
Layout of CGNS file for simple Cartesian structured grid with flow solution at vertices.
Tip
Because GridLocation = Vertex is the default, it is not necessary to specify it.
The vertex flow solution can be read in using the following FORTRAN code segment (can read in as single or double precision - see discussion in the previous section):
!   READ FLOW SOLUTION FROM CGNS FILE
      use cgns
!   open CGNS file for read-only
      call cg_open_f('grid.cgns',CG_MODE_READ,index_file,ier)
      if (ier .ne. CG_OK) call cg_error_exit_f
!   we know there is only one base (real working code would check!)
      index_base=1
!   we know there is only one zone (real working code would check!)
      index_zone=1
!   we know there is only one FlowSolution_t (real working code would check!)
      index_flow=1
!   get zone size (and name - although not needed here)
      call cg_zone_read_f(index_file,index_base,index_zone,zonename,
     + isize,ier)
!   lower range index
      irmin(1)=1
      irmin(2)=1
      irmin(3)=1
!   upper range index - use vertex dimensions
!   checking GridLocation first (real working code would check
!   to make sure there are no Rind cells also!):
      call cg_sol_info_f(index_file,index_base,index_zone,index_flow,
     + solname,loc,ier)
      if (loc .ne. Vertex) then
        write(6,'('' Error, GridLocation must be Vertex!'')')
        stop
      end if
      irmax(1)=isize(1,1)
      irmax(2)=isize(2,1)
      irmax(3)=isize(3,1)
!   read flow solution
      call cg_field_read_f(index_file,index_base,index_zone,index_flow,
     + 'Density',RealSingle,irmin,irmax,r,ier)
      call cg_field_read_f(index_file,index_base,index_zone,index_flow,
     + 'Pressure',RealSingle,irmin,irmax,p,ier)
!   close CGNS file
      call cg_close_f(index_file,ier)
Note
This code segment assumes that it is known that the flow solution contains no rind data (to be covered in detail below). If rind data does exist, but the user does not account for it, then the flow solution information will be read incorrectly. Hence, a real working code would check for rind cells, and adjust the dimensions and index ranges appropriately. Other similar cautions as those mentioned earlier regarding dimensioning of variables, real working code checks, etc., apply here as well. These cautions will not always be repeated from this point forward.
(b) Flow Solution at Cell Centers
The option for outputting the flow solution at cell centers is illustrated schematically in 2-D in the figure below. The flow solutions are defined at the centers of the cells defined by the four surrounding grid points. In 3-D, the cell centers are defined by eight surrounding grid points.
Schematic showing location (circles) of CellCenter flow solution relative to grid.
The code segment to write to cell centers is identical to that given above for vertices, except that the call to cg_sol_write_f is replaced by:
!   create flow solution node (NOTE USE OF CellCenter HERE)
      call cg_sol_write_f(index_file,index_base,index_zone,solname,
     + CellCenter,index_flow,ier)
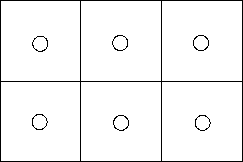
Also, now the density (r) and pressure (p) variables must be dimensioned correctly for this particular case: for a tri-dimensional array, (20,16,N), where N ≥ 8 (i.e., one less in each index dimension than the grid itself). Again, the API, knowing that the flow solution type is CellCenter, automatically writes out the correct index range, corresponding with the zone’s grid index range minus 1 in each index direction.
The layout of the CGNS file with the flow solution at cell centers is shown (below the FlowSolution_t node only) in the next figure. Note that the indices over which the flow solutions are written are now from (1,1,1) to (20,16,8) (contrast with the FlowSolution part of the figure with the flow solution at vertices
layout of cgns file (under flowsolution_t node) for simple cartesian structured grid with flow solution at cell centers.
The FORTRAN code segment to read in the solution at cell centers is the same as that given above for vertices, except that the section that defines irmax is replaced by:
!   upper range index - use cell dimensions
!   checking GridLocation first (real working code would check
!   to make sure there are no Rind cells also!):
      call cg_sol_info_f(index_file,index_base,index_zone,index_flow,
     + solname,loc,ier)
      if (loc .ne. CellCenter) then
        write(6,'('' Error, GridLocation must be CellCenter!'')')
        stop
      end if
      irmax(1)=isize(1,2)
      irmax(2)=isize(2,2)
      irmax(3)=isize(3,2)
and, as usual, the r and p arrays must be dimensioned appropriately.
(c) Flow Solution at Cell Centers With Additional Rind Data
Rind data is additional flow solution data exterior to a grid, at “ghost” locations. Rind data can be associated with other GridLocation values beside CellCenter, although we only show an example using CellCenter here. Furthermore, this example is for structured grids only, for which Rind data can be defined implicitly (via indexing conventions alone). The option for outputting the flow solution at cell centers with additional rind data is illustrated schematically in 2-D in the figure below. In this diagram, we show one layer of rind cell data in the row below the grid itself. There could be rind data at other sides of the grid, or there could be more than one row at a given side.
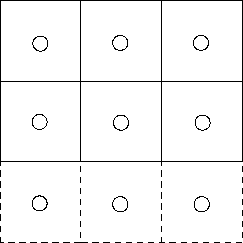
Schematic showing location (circles) of CellCenter flow solution, including rind cells, relative to grid.
In CGNS, the flow solution at rind cells is not stored as separate entities, but rather the flow solution range is extended to include the rind cells. For example, in the 2-D schematic of the above figure, instead of an index range of p(3,2) for pressures stored at the cell centers, the flow solution would now have an index range of p(3,0:2) or p(3,3). See the SIDS document for details.
For our 3-D example, we assume that we have one row of rind data at 4 faces of the zone (ilo, ihi, jlo, jhi, where these represent the low and high ends of the i and j directions, respectively), and no rind cells at klo or khi (at either end of the k direction). The code segment to write the flow solution and rind data is as follows:
!   WRITE FLOW SOLUTION TO EXISTING CGNS FILE
      use cgns
!   open CGNS file for modify
      call cg_open_f('grid.cgns',CG_MODE_MODIFY,index_file,ier)
      if (ier .ne. CG_OK) call cg_error_exit_f
!   we know there is only one base (real working code would check!)
      index_base=1
!   we know there is only one zone (real working code would check!)
      index_zone=1
!   define flow solution node name (user can give any name)
      solname = 'FlowSolution'
!   create flow solution node (NOTE USE OF CellCenter HERE)
      call cg_sol_write_f(index_file,index_base,index_zone,solname,
     + CellCenter,index_flow,ier)
!  go to position within tree at FlowSolution_t node
      call cg_goto_f(index_file,index_base,ier,'Zone_t',index_zone,
     + 'FlowSolution_t',index_flow,'end')
!   write rind information under FlowSolution_t node (ilo,ihi,jlo,jhi,klo,khi)
      irinddata(1)=1
      irinddata(2)=1
      irinddata(3)=1
      irinddata(4)=1
      irinddata(5)=0
      irinddata(6)=0
      call cg_rind_write_f(irinddata,ier)
!   write flow solution (user must use SIDS-standard names here)
      call cg_field_write_f(index_file,index_base,index_zone,index_flow,
     + RealDouble,'Density',r,index_field,ier)
      call cg_field_write_f(index_file,index_base,index_zone,index_flow,
     + RealDouble,'Pressure',p,index_field,ier)
!   close CGNS file
      call cg_close_f(index_file,ier)
Note that in the case of rind data, the user must position the Rind_t node appropriately, using the cg_goto_f call. In this case, the Rind_t node belongs under the FlowSolution_t node.
For this case of cell center flow solution with rind data, the density (r) and pressure (p) are written to the CGNS file with the following index ranges: from i = 0 to i = 20 + 1 = 21 (or a total i length of 22), from j = 0 to j = 16 + 1 = 17 (or a total j length of 18), and from k = 1 to k = 8. The variables r and p must be dimensioned appropriately to reflect these index ranges modified by the rind values.
The layout of the CGNS file for this example (below the FlowSolution_t node only) is shown below. Compare this figure with the figures for the flow solution at vertices and for the flow solution at cell centers without rind data.
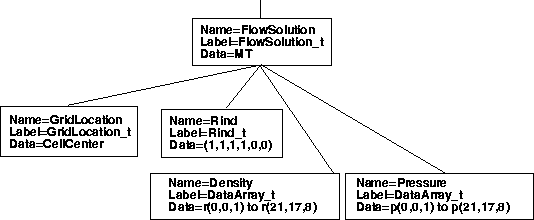
Layout of CGNS file (under FlowSolution_t node) for simple Cartesian structured grid with flow solution at cell centers plus rind data
A FORTRAN code segment to read the flow solution for this example is:
!   READ FLOW SOLUTION FROM CGNS FILE
      use cgns
!   open CGNS file for read-only
      call cg_open_f('grid.cgns',CG_MODE_READ,index_file,ier)
      if (ier .ne. CG_OK) call cg_error_exit_f
!   we know there is only one base (real working code would check!)
      index_base=1
!   we know there is only one zone (real working code would check!)
      index_zone=1
!   we know there is only one FlowSolution_t (real working code would check!)
      index_flow=1
!   get zone size (and name - although not needed here)
      call cg_zone_read_f(index_file,index_base,index_zone,zonename,
     + isize,ier)
!  go to position within tree at FlowSolution\_t node
      call cg_goto_f(index_file,index_base,ier,'Zone_t',index_zone,
     + 'FlowSolution_t',index_flow,'end')
!  read rind data
      call cg_rind_read_f(irinddata,ier)
!   lower range index
      irmin(1)=1
      irmin(2)=1
      irmin(3)=1
!   upper range index - use cell dimensions and rind info
!   checking GridLocation first:
      call cg_sol_info_f(index_file,index_base,index_zone,index_flow,
     + solname,loc,ier)
      if (loc .ne. CellCenter) then
        write(6,'('' Error, GridLocation must be CellCenter!'')')
      stop
      end if
      irmax(1)=isize(1,2)+irinddata(1)+irinddata(2)
      irmax(2)=isize(2,2)+irinddata(3)+irinddata(4)
      irmax(3)=isize(3,2)+irinddata(5)+irinddata(6)
!   read flow solution
      call cg_field_read_f(index_file,index_base,index_zone,index_flow,
     + 'Density',RealSingle,irmin,irmax,r,ier)
      call cg_field_read_f(index_file,index_base,index_zone,index_flow,
     + 'Pressure',RealSingle,irmin,irmax,p,ier)
!   close CGNS file
      call cg_close_f(index_file,ier)
Single-Zone Structured Grid with Boundary Conditions
To illustrate the use of boundary conditions, we again use the same single-zone Cartesian grid. Referring back to the grid figure, we wish to apply the following:
ilo - BCTunnelInflow
ihi - BCExtrapolate
jlo - BCWallInviscid
jhi - etc.
klo - etc.
khi - etc.
where BCTunnelInflow, BCExtrapolate, and BCWallInviscid are data-name identifiers for boundary conditions. The complete list of boundary condition identifiers is found in the SIDS document. In this example, we take the approach of using the lowest-level BC implementation allowed - see the figure showing the general hierarchical structure of ZoneBC_t in the SIDS overview section.
In this section, we show two different approaches for defining the region over which each boundary condition acts. The first is with type PointRange, meaning that we define the minimum and maximum points on a face that define a logically rectangular region (this method is usable only for faces that are capable of being defined in this way). The second is with type PointList, which gives the list of all the points for which the boundary condition applies. This latter method is generally used for any zone whose defined region is not logically rectangular.
(a) Boundary Conditions Specifying Range
A FORTRAN code segment to write the boundary condition information of type PointRange to the existing CGNS file from the previous two sections is given here:
!  WRITE BOUNDARY CONDITIONS TO EXISTING CGNS FILE
      use cgns
!  open CGNS file for modify
      call cg_open_f('grid.cgns',CG_MODE_MODIFY,index_file,ier)
      if (ier .ne. CG_OK) call cg_error_exit_f
!  we know there is only one base (real working code would check!)
      index_base=1
!  we know there is only one zone (real working code would check!)
      index_zone=1
!   get zone size (and name - although not needed here)
      call cg_zone_read_f(index_file,index_base,index_zone,zonename,
     + isize,ier)
      ilo=1
      ihi=isize(1,1)
      jlo=1
      jhi=isize(2,1)
      klo=1
      khi=isize(3,1)
!  write boundary conditions for ilo face, defining range first
!  (user can give any name)
!  lower point of range
      ipnts(1,1)=ilo
      ipnts(2,1)=jlo
      ipnts(3,1)=klo
!  upper point of range
      ipnts(1,2)=ilo
      ipnts(2,2)=jhi
      ipnts(3,2)=khi
      call cg_boco_write_f(index_file,index_base,index_zone,'Ilo',
     + BCTunnelInflow,PointRange,2,ipnts,index_bc,ier)
!  write boundary conditions for ihi face, defining range first
!  (user can give any name)
!  lower point of range
      ipnts(1,1)=ihi
      ipnts(2,1)=jlo
      ipnts(3,1)=klo
!  upper point of range
      ipnts(1,2)=ihi
      ipnts(2,2)=jhi
      ipnts(3,2)=khi
      call cg_boco_write_f(index_file,index_base,index_zone,'Ihi',
     + BCExtrapolate,PointRange,2,ipnts,index_bc,ier)
!  write boundary conditions for jlo face, defining range first
!  (user can give any name)
!  lower point of range
      ipnts(1,1)=ilo
      ipnts(2,1)=jlo
      ipnts(3,1)=klo
!  upper point of range
      ipnts(1,2)=ihi
      ipnts(2,2)=jlo
      ipnts(3,2)=khi
      call cg_boco_write_f(index_file,index_base,index_zone,'Jlo',
     + BCWallInviscid,PointRange,2,ipnts,index_bc,ier)
      ... etc...
!  close CGNS file
      call cg_close_f(index_file,ier)
The zone names (e.g., Ilo) are arbitrary. Note that the variable zonename must be declared as a character variable, and isize and ipnts must be dimensioned appropriately.
The layout of the CGNS file for this example is shown below. Four of the children nodes of ZoneBC_t are left off for clarity.

Layout of CGNS file for simple Cartesian structured grid with flow solution and boundary conditions using PointRange.
Reading the boundary conditions can also be easily accomplished using API calls, but we do not show an example of this here. Because there are multiple BC_t children nodes under the ZoneBC_t node, the user must first read in the number of children nodes that exist, then loop through them and retrieve the information from each.
(b) Boundary Conditions Specifying Points
The FORTRAN code segment to write the boundary conditions using PointList is the same as that for PointRange except that the following segment, for example,
!  write boundary conditions for ilo face, defining range first
!  (user can give any name)
      ipnts(1,1)=ilo
      ipnts(2,1)=jlo
      ipnts(3,1)=klo
      ipnts(1,2)=ilo
      ipnts(2,2)=jhi
      ipnts(3,2)=khi
      call cg_boco_write_f(index_file,index_base,index_zone,'Ilo',
     + BCTunnelInflow,PointRange,2,ipnts,index_bc,ier)
is replaced by
!  write boundary conditions for ilo face, defining pointlist first
!  (user can give any name)
      icount=0
      do j=jlo,jhi
        do k=klo,khi
          icount=icount+1
          ipnts(1,icount)=ilo
          ipnts(2,icount)=j
          ipnts(3,icount)=k
        enddo
      enddo
      call cg_boco_write_f(index_file,index_base,index_zone,'Ilo',
     + BCTunnelInflow,PointList,icount,ipnts,index_bc,ier)
The layout of the CGNS file in this case is the same as in the above figure, except that PointRange (IndexRange_t) becomes PointList (IndexArray_t) and there is icount data in the PointList nodes.
Multi-Zone Structured Grid with 1-to-1 Connectivity
For the case of a multi-zone structured grid, each zone is handled individually in the same way as the examples in the preceding sections. However, multi-zone grids also require additional information about how the zones are connected to one another. A discussion of different types of zone-to-zone connectivity can be found in the SIDS overview section. For the example in this section, we show only a simple 1-to-1 connectivity example. We assume that we have a two-zone grid, each identical to the single zone used previously (21 × 17 × 9), except that zone 2 is offset in the x-direction by 20 units. Thus, the ilo face of zone 2 abuts the ihi face of zone 1, and each abutting point in the two zones touches a point from the neighboring zone. A picture of the grid is shown below.
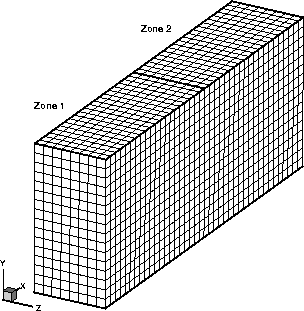
2-Zone Cartesian structured grid with 1-to-1 connectivity.
The overall layout of this two-zone CGNS file is not shown here. It is similar to those shown earlier, except now there are two zones rather than one. See the SIDS overview for an additional example.
Now, 1-to-1 connectivity information must be written into each of the zones. There are two ways to record this 1-to-1 information. The first (specific) method is valid only for 1-to-1 interfaces, and the regions must be logically rectangular (because they are recorded via PointRange and PointRangeDonor nodes, for which only two points define the entire region). The second way is more general. It uses PointList nodes in combination with PointListDonor. (A third method, used to describe interfaces that are not point-matched - such as mismatched or overset zones - employs CellListDonor and InterpolantsDonor.) Refer to the SIDS document for details on the various methods for describing connectivity.
(a) Connectivity Using Specific 1-to-1 Method
The 1-to-1 connectivity information for the current example can be written to a CGNS file using the following FORTRAN code segment (assuming that all grid information has already been written):
!  WRITE 1-TO-1 CONNECTIVITY INFORMATION TO EXISTING CGNS FILE
      use cgns
!  open CGNS file for modify
      call cg_open_f('grid.cgns',CG_MODE_MODIFY,index_file,ier)
      if (ier .ne. CG_OK) call cg_error_exit_f
!  we know there is only one base (real working code would check!)
      index_base=1
!   get number of zones (should be 2 for our case)
      call cg_nzones_f(index_file,index_base,nzone,ier)
!   loop over zones to get zone sizes and names
      do index_zone=1,nzone
        call cg_zone_read_f(index_file,index_base,index_zone,
     +    zonename(index_zone),isize,ier)
        ilo(index_zone)=1
        ihi(index_zone)=isize(1,1)
        jlo(index_zone)=1
        jhi(index_zone)=isize(2,1)
        klo(index_zone)=1
        khi(index_zone)=isize(3,1)
      enddo
!   loop over zones again
      do index_zone=1,nzone
!   set up index ranges
        if (index_zone .eq. 1) then
          donorname=zonename(2)
!   lower point of receiver range
          ipnts(1,1)=ihi(1)
          ipnts(2,1)=jlo(1)
          ipnts(3,1)=klo(1)
!   upper point of receiver range
          ipnts(1,2)=ihi(1)
          ipnts(2,2)=jhi(1)
          ipnts(3,2)=khi(1)
!   lower point of donor range
          ipntsdonor(1,1)=ilo(2)
          ipntsdonor(2,1)=jlo(2)
          ipntsdonor(3,1)=klo(2)
!   upper point of donor range
          ipntsdonor(1,2)=ilo(2)
          ipntsdonor(2,2)=jhi(2)
          ipntsdonor(3,2)=khi(2)
        else
          donorname=zonename(1)
!   lower point of receiver range
          ipnts(1,1)=ilo(2)
          ipnts(2,1)=jlo(2)
          ipnts(3,1)=klo(2)
!   upper point of receiver range
          ipnts(1,2)=ilo(2)
          ipnts(2,2)=jhi(2)
          ipnts(3,2)=khi(2)
!   lower point of donor range
          ipntsdonor(1,1)=ihi(1)
          ipntsdonor(2,1)=jlo(1)
          ipntsdonor(3,1)=klo(1)
!   upper point of donor range
          ipntsdonor(1,2)=ihi(1)
          ipntsdonor(2,2)=jhi(1)
          ipntsdonor(3,2)=khi(1)
        end if
!   set up Transform
        itranfrm(1)=1
        itranfrm(2)=2
        itranfrm(3)=3
!   write 1-to-1 info (user can give any name)
        call cg_1to1_write_f(index_file,index_base,index_zone,
     +    'Interface',donorname,ipnts,ipntsdonor,itranfrm,
     +    index_conn,ier)
      enddo
!  close CGNS file
      call cg_close_f(index_file,ier)
Note that this code segment is geared very specifically toward our 2-zone example, i.e., it relies on our knowledge of this particular case. Transform defines the relative orientation of the i, j, and k indices of the abutting zones. Details concerning the values of Transform can be found in the SIDS document. However, note that Transform values of (1,2,3) indicate that the i, j, k axes of both zones are oriented in the same directions. Reading the connectivity information can also be easily accomplished using API calls, but we do not show an example of this here. And finally, we do not show the layout of the nodes associated with the connectivity here. The interested user is referred to the SIDS overview for an example figure.
(b) Connectivity Using General Method
Using a more general method, for which each connectivity pair is listed (rather than ranges), the connectivity information for the current example can be written to a CGNS file using the following FORTRAN code segment:
!  WRITE GENERAL CONNECTIVITY INFORMATION TO EXISTING CGNS FILE
      use cgns
!  open CGNS file for modify
      call cg_open_f('grid.cgns',CG_MODE_MODIFY,index_file,ier)
      if (ier .ne. CG_OK) call cg_error_exit_f
!  we know there is only one base (real working code would check!)
      index_base=1
!   get number of zones (should be 2 for our case)
      call cg_nzones_f(index_file,index_base,nzone,ier)
!   loop over zones to get zone sizes and names
      do index_zone=1,nzone
        call cg_zone_read_f(index_file,index_base,index_zone,
     +    zonename(index_zone),isize,ier)
        ilo(index_zone)=1
        ihi(index_zone)=isize(1,1)
        jlo(index_zone)=1
        jhi(index_zone)=isize(2,1)
        klo(index_zone)=1
        khi(index_zone)=isize(3,1)
      enddo
!   loop over zones again
      do index_zone=1,nzone
!   set up point lists
        if (index_zone .eq. 1) then
          icount=0
          do j=jlo(index_zone),jhi(index_zone)
            do k=klo(index_zone),khi(index_zone)
              icount=icount+1
              ipnts(1,icount)=ihi(1)
              ipnts(2,icount)=j
              ipnts(3,icount)=k
              ipntsdonor(1,icount)=ilo(2)
              ipntsdonor(2,icount)=j
              ipntsdonor(3,icount)=k
            enddo
          enddo
          donorname=zonename(2)
        else
          icount=0
          do j=jlo(index_zone),jhi(index_zone)
            do k=klo(index_zone),khi(index_zone)
              icount=icount+1
              ipnts(1,icount)=ilo(2)
              ipnts(2,icount)=j
              ipnts(3,icount)=k
              ipntsdonor(1,icount)=ihi(1)
              ipntsdonor(2,icount)=j
              ipntsdonor(3,icount)=k
            enddo
          enddo
          donorname=zonename(1)
        end if
!   write integer connectivity info (user can give any name)
        call cg_conn_write_f(index_file,index_base,index_zone,
     +    'GenInterface',Vertex,Abutting1to1,PointList,icount,ipnts,
     +    donorname,Structured,PointListDonor,Integer,icount,
     +    ipntsdonor,index_conn,ier)
      enddo
!  close CGNS file
      call cg_close_f(index_file,ier)
The method for recording mismatched (patched) or overset connectivity information is described in the SIDS document. However, note that in such cases the use of CellListDonor (along with InterpolantsDonor) implies the specification of cell center indices on the donor side (these would correspond to element numbers in unstructured zones). The InterpolantsDonor information consists of real-valued interpolants.
Unstructured Grid
This section gives several unstructured grid examples. The user should already be familiar with the information covered in the previous section, which gives structured grid examples. Because much of the organization of the CGNS files is identical for both grid types, many of the ideas covered in the structured grid section are not repeated again here.
Single-Zone Unstructured Grid
This example uses the exact single-zone grid shown earlier. However, it is now written as an unstructured grid, which is made up of a series of 6-sided elements (cubes in this case). A FORTRAN code segment that uses API calls to write this grid to a CGNS file called grid.cgns is shown here (note that it does not matter how the nodes are ordered in an unstructured zone, but in this example they are ordered sequentially for simplicity of presentation):
!  WRITE X, Y, Z GRID POINTS TO CGNS FILE
      use cgns
!  open CGNS file for write
      call cg_open_f('grid.cgns',CG_MODE_WRITE,index_file,ier)
      if (ier .ne. CG_OK) call cg_error_exit_f
!  create base (user can give any name)
      basename='Base'
      icelldim=3
      iphysdim=3
      call cg_base_write_f(index_file,basename,icelldim,iphysdim,
     + index_base,ier)
!  define zone name (user can give any name)
      zonename = 'Zone  1'
!  we use the same grid as for the structured example with ni=21,
!  nj=17, nk=9.  The variables ni, nj, and nk are still used later,
!  for convenience when numbering the unstructured grid elements.
      ni=21
      nj=17
      nk=9
!  vertex size (21*17*9 = 3213)
      isize(1,1)=3213
!  cell size (20*16*8 = 2560)
      isize(1,2)=2560
!  boundary vertex size (zero if elements not sorted)
      isize(1,3)=0
!  create zone
      call cg_zone_write_f(index_file,index_base,zonename,isize,
     + Unstructured,index_zone,ier)
!  write grid coordinates (user must use SIDS-standard names here)
      call cg_coord_write_f(index_file,index_base,index_zone,RealDouble,
     + 'CoordinateX',x,index_coord,ier)
      call cg_coord_write_f(index_file,index_base,index_zone,RealDouble,
     + 'CoordinateY',y,index_coord,ier)
      call cg_coord_write_f(index_file,index_base,index_zone,RealDouble,
     + 'CoordinateZ',z,index_coord,ier)
!  set element connectivity:
!  do all the HEX_8 elements (this part is mandatory):
!  maintain SIDS-standard ordering
      ielem_no=0
!  index no of first element
      nelem_start=1
      do k=1,nk-1
        do j=1,nj-1
          do i=1,ni-1
            ielem_no=ielem_no+1
!  in this example, due to the order in the node numbering, the
!  hexahedral elements can be reconstructed using the following
!  relationships:
            ifirstnode=i+(j-1)*ni+(k-1)*ni*nj
            ielem(1,ielem_no)=ifirstnode
            ielem(2,ielem_no)=ifirstnode+1
            ielem(3,ielem_no)=ifirstnode+1+ni
            ielem(4,ielem_no)=ifirstnode+ni
            ielem(5,ielem_no)=ifirstnode+ni*nj
            ielem(6,ielem_no)=ifirstnode+ni*nj+1
            ielem(7,ielem_no)=ifirstnode+ni*nj+1+ni
            ielem(8,ielem_no)=ifirstnode+ni*nj+ni
          enddo
        enddo
      enddo
!  index no of last element (=2560)
      nelem_end=ielem_no
!  unsorted boundary elements
      nbdyelem=0
!  write HEX_8 element connectivity (user can give any name)
      call cg_section_write_f(index_file,index_base,index_zone,
     +  'Elem',HEXA_8,nelem_start,nelem_end,nbdyelem,ielem,
     +  index_section,ier)
!  close CGNS file
      call cg_close_f(index_file,ier)
Note that for unstructured zones, the index dimension is always 1 (because only one index value is required to identify a position in the mesh), so the isize array contains the total vertex size, cell size, and boundary vertex size for the zone. In this example, the ielem array must be dimensioned exactly as (8,N), where N is greater than or equal to the total number of elements. The node points that lie in the lower left corner of the grid are shown schematically for two elements in the figure below. Here it can be seen, for example, that node numbers 1, 2, 23, 22, 358, 359, 380, and 379 make up element 1.
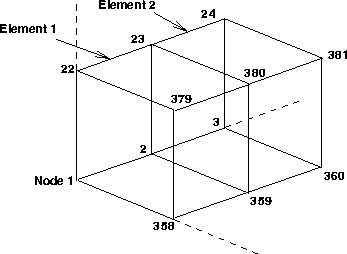
Schematic representation of nodes and elements of unstructured grid.
The overall layout of the CGNS file created by the above code segment is shown below. The nodes for y and z are left off due to lack of space. Compare this figure with the layout for the structured version of this grid.
Layout of CGNS file for unstructured grid.
For unstructured zones, the user may also wish to separately list the boundary elements in the CGNS file. This may be useful for assigning boundary conditions, as we will show later. In the current example, assume that the user wishes to assign three different types of boundary conditions: inflow at one end, outflow at the other end, and side walls on the four faces in-between. To accomplish this, it would be helpful to have three additional Elements_t nodes in the CGNS file, each of which lists the corresponding faces as elements (QUAD_4 in this case).
A FORTRAN code segment that accomplishes a part of this is given here. It may be a part of the same code (above) that defined the grid and HEXA_8 connectivity.
!  do boundary (QUAD) elements (this part is optional,
!  but you must do it if you eventually want to define BCs
!  at element faces rather than at nodes):
!  INFLOW:
      ielem_no=0
!  index no of first element
      nelem_start=nelem_end+1
      i=1
      do k=1,nk-1
        do j=1,nj-1
          ielem_no=ielem_no+1
          ifirstnode=i+(j-1)*ni+(k-1)*ni*nj
          jelem(1,ielem_no)=ifirstnode
          jelem(2,ielem_no)=ifirstnode+ni*nj
          jelem(3,ielem_no)=ifirstnode+ni*nj+ni
          jelem(4,ielem_no)=ifirstnode+ni
        enddo
      enddo
!  index no of last element
      nelem_end=nelem_start+ielem_no-1
!  write QUAD element connectivity for inflow face (user can give any name)
      call cg_section_write_f(index_file,index_base,index_zone,
     +  'InflowElem',QUAD_4,nelem_start,nelem_end,nbdyelem,
     +  jelem,index_section,ier)
!  OUTFLOW:
      ... etc...
In this example, the jelem array must be dimensioned exactly as (4,N), where N is greater than or equal to the total number of elements. Note that the nelem_start and nelem_end range is defined subsequent to the range of any other elements (i.e., the HEXA_8 elements) already defined in this zone. In other words, all elements in a given zone must have a different number.
The layout of the CGNS file in this case is exactly the same as that shown in the previous figure, except that there are now three additional Elements_t nodes under Zone_t. These are shown separately below.
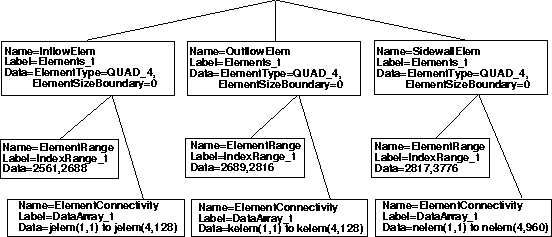
Layout of additional `Elements_t` boundary face nodes.
Single-Zone Unstructured Grid and Flow Solution
To add a flow solution to an unstructured zone, the procedure is identical to that for a structured zone. However, the Rind field for unstructured grids indicates additional points rather than planes. Example of Rind capability for unstructured grids is not covered here. Considering the vertex and cell-center examples shown previously, the only difference for unstructured zones is that all arrays are one-dimensional (there is only one index), as opposed to three indices for 3-D structured arrays. A vertex solution indicates that the solution is stored at vertices or nodes. In the above example, there would be lists of 3213 data array items per solution variable. A cell center solution implies that the solution is stored at the center of each element. In the above example, there would be lists of 2560 data array items per solution variable.
The overall layout of the CGNS file is the same as that shown previously, except that there would also be a FlowSolution_t node under Zone 1, and this node would have the children nodes GridLocation, Density, and Pressure.
Single-Zone Unstructured Grid with Boundary Conditions
When writing boundary conditions to a CGNS file for an unstructured zone, one can follow the same general procedure outlined previously for a structured zone. In other words, the boundary conditions can be defined for point ranges or for individual points, where the points refer to nodes (vertices) of the grid. Coding would be essentially the same as that presented before, except that the points and/or ranges are now one-dimensional (there is only one index), as opposed to three indices for 3-D structured arrays.
However, for unstructured zones this is generally not the recommended method. Usually, for unstructured zones one has also already defined additional Elements_t nodes that define the boundary face elements. Therefore, it is best for the boundary conditions to be associated with these elements rather than with the nodes.
Because this concept is quite different from what was done with the structured zone earlier, we illustrate it with an example. We earlier showed how to create the additional Elements_t nodes defining the boundary faces. The face-center boundary conditions now can be written using the following code segment.
!  WRITE BOUNDARY CONDITIONS TO EXISTING CGNS FILE
      use cgns
!  open CGNS file for modify
      call cg_open_f('grid.cgns',CG_MODE_MODIFY,index_file,ier)
      if (ier .ne. CG_OK) call cg_error_exit_f
!  we know there is only one base (real working code would check!)
      index_base=1
!  we know there is only one zone (real working code would check!)
      index_zone=1
!  we know that for the unstructured zone, the following face elements
!  have been defined as inflow (real working code would check!):
      nelem_start=2561
      nelem_end=2688
      icount=0
      do n=nelem_start,nelem_end
        icount=icount+1
        ipnts(icount)=n
      enddo
!  write boundary conditions for ilo face
      call cg_boco_write_f(index_file,index_base,index_zone,'Ilo',
     + BCTunnelInflow,PointList,icount,ipnts,index_bc,ier)
!  we know that for the unstructured zone, the following face elements
!  have been defined as outflow (real working code would check!):
      nelem_start=2689
      nelem_end=2816
      icount=0
      do n=nelem_start,nelem_end
        icount=icount+1
        ipnts(icount)=n
      enddo
!  write boundary conditions for ihi face
      call cg_boco_write_f(index_file,index_base,index_zone,'Ihi',
     + BCExtrapolate,PointList,icount,ipnts,index_bc,ier)
!  we know that for the unstructured zone, the following face elements
!  have been defined as walls (real working code would check!):
      nelem_start=2817
      nelem_end=3776
      icount=0
      do n=nelem_start,nelem_end
        icount=icount+1
        ipnts(icount)=n
      enddo
!  write boundary conditions for wall faces
      call cg_boco_write_f(index_file,index_base,index_zone,'Walls',
     + BCWallInviscid,PointList,icount,ipnts,index_bc,ier)
!
!  the above are all face-center locations for the BCs - must indicate this,
!  otherwise Vertices will be assumed!
      do ibc=1,index_bc
!  (the following call positions you in BC_t - it assumes there
!  is only one Zone_t and one ZoneBC_t - real working code would check!)
        call cg_goto_f(index_file,index_base,ier,'Zone_t',1,
     +    'ZoneBC_t',1,'BC_t',ibc,'end')
        call cg_gridlocation_write_f(FaceCenter,ier)
      enddo
!  close CGNS file
      call cg_close_f(index_file,ier)
Note that we assume here that we know in advance the element numbers associated with each of the boundaries. We have written these element numbers as a PointList, but, because they are in order, we could just as easily have used PointRange instead. In that case, only two ipnts values would be needed, equal to nelem_start and nelem_end, and icount would be 2. Finally, note that the GridLocation_t node under BC_t must be written using the API call cg_goto_f (which positions you correctly in the tree) followed by cg_gridlocation_write_f.
Note that the use of ElementList and ElementRange (recommended in previous versions of CGNS) has been deprecated and should not be used in new code. These are still accepted, but will be internally replaced with the appropriate values of PointList/PointRange and GridLocation_t.
A portion of the layout of the CGNS file for the ZoneBC_t node and its children is shown below. The ZoneBC_t node lies directly under Zone_t.

Layout of part of CGNS file for an unstructured zone with boundary conditions defined at face-center elements.
The three figures, showing the general layout of a CGNS file for an unstructured grid, the layout of additional Elements_t boundary face nodes, and the layout at and below the ZoneBC_t node, taken together, constitute the entire layout of the file.
Additional Information
This section introduces several additional types of data in CGNS. These items are by no means necessary to include when getting started, but it is likely that most users will eventually want to implement some of them into their CGNS files at some point in the future. The section ends with a discussion on the usage of links.
Convergence History
The ConvergenceHistory_t node can be used to store data associated with the convergence of a CFD solution. For example, one may wish to store the global coefficient of lift as a function of iterations. In this case, this variable should be stored at the CGNSBase_t level of the CGNS file. This is achieved using the API in the following FORTRAN code segment:
!  WRITE CONVERGENCE HISTORY INFORMATION TO EXISTING CGNS FILE
     use cgns
!  open CGNS file for modify
     call cg_open_f('grid.cgns',CG_MODE_MODIFY,index_file,ier)
     if (ier .ne. CG_OK) call cg_error_exit_f
!  we know there is only one base (real working code would check!)
     index_base=1
!   go to base node
     call cg_goto_f(index_file,index_base,ier,'end')
!   create history node (SIDS names it GlobalConvergenceHistory at base level)
!   ntt is the number of recorded iterations
     call cg_convergence_write_f(ntt,'',ier)
!   go to new history node
     call cg_goto_f(index_file,index_base,ier,'ConvergenceHistory_t',
    +  1,'end')
!   write lift coefficient array (user must use SIDS-standard name here)
     call cg_array_write_f('CoefLift',RealDouble,1,ntt,cl,ier)
!  close CGNS file
     call cg_close_f(index_file,ier)
In this example, the array cl must be declared as an array of size ntt or larger. Additional arrays of the same size may also be written under the ConvergenceHistory_t node. Note that the call to cg_convergence_write_f includes a blank string in this case, because we are not recording norm definitions.
Descriptor Nodes
Descriptor nodes, which record character strings and can be inserted nearly everywhere in a CGNS file, have many possible uses. Users can insert comments or descriptions to help clarify the content of some data in the CGNS file. In the SIDS overview section, we mention a possible use for descriptor nodes to describe data that is UserDefinedData_t. Another potentially desirable use of the descriptor node is to maintain copies of the entire input file(s) from the CFD application code. Because descriptor nodes can include carriage returns, entire ASCII files can be “swallowed” into the CGNS file. In this way, a future user can see and retrieve the exact input file(s) used by the CFD code to generate the data contained in the CGNS file. The only ambiguity possible would be whether the CFD code itself has changed since that time; but if the CFD code has strict version control, then complete recoverability should be possible.
An example that writes a descriptor node at the CGNSBase_t level is given here:
!  WRITE DESCRIPTOR NODE AT BASE LEVEL
     use cgns
!  open CGNS file for modify
     call cg_open_f('grid.cgns',CG_MODE_MODIFY,index_file,ier)
     if (ier .ne. CG_OK) call cg_error_exit_f
!  we know there is only one base (real working code would check!)
     index_base=1
!   go to base node
     call cg_goto_f(index_file,index_base,ier,'end')
!   write descriptor node (user can give any name)
     text1='Supersonic vehicle with landing gear'
     text2='M=4.6, Re=6 million'
     textstring=text1//char(10)//text2
     call cg_descriptor_write_f('Information',textstring,ier)
!  close CGNS file
     call cg_close_f(index_file,ier)
In this example, the Descriptor_t node is named Information and the character string textstring (which is made up of text1 and text2 with a line feed - char(10) - in-between) is written there. All character strings must be declared appropriately.
Dimensional Data
The node DataClass_t denotes the class of the data. When data is dimensional, then DataClass_t = Dimensional. The DataClass_t node can appear at many levels in the CGNS hierarchy; precedence rules dictate that a DataClass_t lower in the hierarchy supersedes any higher up.
For dimensional data, one generally is expected to indicate the dimensionality of each particular variable through the use of DataClass_t, DimensionalUnits_t, and DimensionalExponents_t. An example of this is shown in the following code segment in which units are added to the structured grid and cell center flow solution used previously.
!   WRITE DIMENSIONAL INFO FOR GRID AND FLOW SOLN
      use cgns
!   open CGNS file for modify
     call cg_open_f('grid.cgns',CG_MODE_MODIFY,index_file,ier)
     if (ier .ne. CG_OK) call cg_error_exit_f
!   we know there is only one base (real working code would check!)
     index_base=1
!   we know there is only one zone (real working code would check!)
     index_zone=1
!   we know there is only one FlowSolution_t (real working code would check!)
     index_flow=1
!   we know there is only one GridCoordinates_t (real working code would check!)
     index_grid=1
!   put DataClass and DimensionalUnits under Base
     call cg_goto_f(index_file,index_base,ier,'end')
     call cg_dataclass_write_f(Dimensional,ier)
     call cg_units_write_f(Kilogram,Meter,Second,Kelvin,Degree,ier)
!   read fields
     call cg_nfields_f(index_file,index_base,index_zone,index_flow,
    +  nfields,ier)
     do if=1,nfields
       call cg_field_info_f(index_file,index_base,index_zone,
    +    index_flow,if,idatatype,fieldname,ier)
       if (fieldname .eq. 'Density') then
         exponents(1)=1.
         exponents(2)=-3.
         exponents(3)=0.
         exponents(4)=0.
         exponents(5)=0.
       else if (fieldname .eq. 'Pressure') then
         exponents(1)=1.
         exponents(2)=-1.
         exponents(3)=-2.
         exponents(4)=0.
         exponents(5)=0.
       else
         write(6,'('' Error! this fieldname not expected: '',a32)')
    +      fieldname
         stop
       end if
!   write DimensionalExponents
       call cg_goto_f(index_file,index_base,ier,'Zone_t',1,
    +   'FlowSolution_t',1,'DataArray_t',if,'end')
       call cg_exponents_write_f(RealSingle,exponents,ier)
     enddo
!   read grid
     call cg_ncoords_f(index_file,index_base,index_zone,ncoords,ier)
     exponents(1)=0.
     exponents(2)=1.
     exponents(3)=0.
     exponents(4)=0.
     exponents(5)=0.
     do ic=1,ncoords
!   write DimensionalExponents
       call cg_goto_f(index_file,index_base,ier,'Zone_t',1,
    +   'GridCoordinates_t',1,'DataArray_t',ic,'end')
       call cg_exponents_write_f(RealSingle,exponents,ier)
     enddo
!   close CGNS file
     call cg_close_f(index_file,ier)
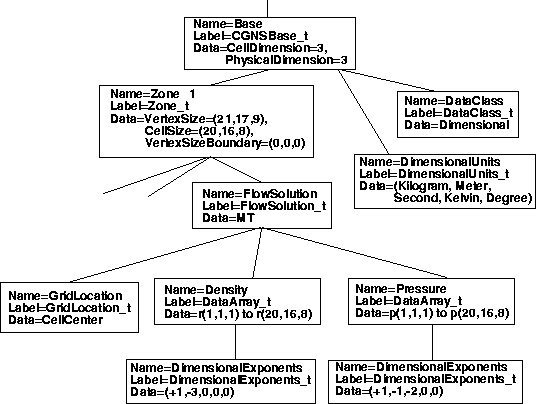
Notice in this example that a DataClass_t node and a DimensionalUnits_t node are placed near the top of the hierarchy, under CGNSBase_t. DataClass_t is specified as Dimensional, and DimensionalUnits_t are specified as (Kilogram, Meter, Second, Kelvin, Degree). These specify that, by and large, the entire database is dimensional with MKS units (anything that is not dimensional or not MKS units could be superseded at lower levels). Then, for each variable locally, one need only specify the DimensionalExponents, where one exponent is defined for each unit.
The layout of part of the resulting CGNS file from the above example is shown below. The density has units of kilogram/meter3, and the pressure has units of kilogram/(meter-second2). The grid coordinates (not shown in the figure) have units of meters.
Layout of part of a CGNS file for flow solution at cell centers with dimensional data.
Nondimensional Data
This example is for the relatively common occurrence of CFD data that is purely nondimensional, for which the reference state is arbitrary (unknown). This type is referred to as NormalizedByUnknownDimensional. Another nondimensional type, NormalizedByDimensional, for which the data is nondimensional but the reference state is specifically known, is not covered here.
For a NormalizedByUnknownDimensional database, the DataClass is recorded as such, but also a ReferenceState is necessary to define the nondimensionalizations used. (A ReferenceState_t node can be used for any dataset to indicate the global reference state (such as free stream), as well as quantities such as the reference Mach number and Reynolds number. A ReferenceState_t node was not included in the previous section, but it could have been.)
For the current example, we do not go into detail regarding the choices of the items which should define the reference state for a NormalizedByUnknownDimensional database. We simply show in the example some typical choices which very often would likely be included. A detailed discussion of how the data in ReferenceState_t defines the nondimensionalizations is given in the SIDS document.
!   WRITE NONDIMENSIONAL INFO
      use cgns
!   open CGNS file for modify
     call cg_open_f('grid.cgns',CG_MODE_MODIFY,index_file,ier)
     if (ier .ne. CG_OK) call cg_error_exit_f
!   we know there is only one base (real working code would check!)
     index_base=1
!   put DataClass under Base
     call cg_goto_f(index_file,index_base,ier,'end')
     call cg_dataclass_write_f(NormalizedByUnknownDimensional,ier)
!   put ReferenceState under Base
     call cg_state_write_f('ReferenceQuantities',ier)
!   Go to ReferenceState node, write Mach array and its dataclass
     call cg_goto_f(index_file,index_base,ier,'ReferenceState_t',1,
    +  'end')
     call cg_array_write_f('Mach',RealDouble,1,1,xmach,ier)
     call cg_goto_f(index_file,index_base,ier,'ReferenceState_t',1,
    +  'DataArray_t',1,'end')
     call cg_dataclass_write_f(NondimensionalParameter,ier)
!   Go to ReferenceState node, write Reynolds array and its dataclass
     call cg_goto_f(index_file,index_base,ier,'ReferenceState_t',1,
    +  'end')
     call cg_array_write_f('Reynolds',RealDouble,1,1,reue,ier)
     call cg_goto_f(index_file,index_base,ier,'ReferenceState_t',1,
    +  'DataArray_t',2,'end')
     call cg_dataclass_write_f(NondimensionalParameter,ier)
!   Go to ReferenceState node to write reference quantities:
     call cg_goto_f(index_file,index_base,ier,'ReferenceState_t',1,
    +  'end')
!   First, write reference quantities that make up Mach and Reynolds:
!   Mach_Velocity
     call cg_array_write_f('Mach_Velocity',RealDouble,1,1,xmv,ier)
!   Mach_VelocitySound
     call cg_array_write_f('Mach_VelocitySound',RealDouble,
    +   1,1,xmc,ier)
!   Reynolds_Velocity
     call cg_array_write_f('Reynolds_Velocity',RealDouble,
    +   1,1,rev,ier)
!   Reynolds_Length
     call cg_array_write_f('Reynolds_Length',RealDouble,
    +   1,1,rel,ier)
!   Reynolds_ViscosityKinematic
     call cg_array_write_f('Reynolds_ViscosityKinematic',RealDouble,
    +   1,1,renu,ier)
!
!   Next, write flow field reference quantities:
!   Density
     call cg_array_write_f('Density',RealDouble,1,1,rho0,ier)
!   Pressure
     call cg_array_write_f('Pressure',RealDouble,1,1,p0,ier)
!   VelocitySound
     call cg_array_write_f('VelocitySound',RealDouble,1,1,c0,ier)
!   ViscosityMolecular
     call cg_array_write_f('ViscosityMolecular',RealDouble,
    +   1,1,vm0,ier)
!   LengthReference
     call cg_array_write_f('LengthReference',RealDouble,
    +   1,1,xlength0,ier)
!   VelocityX
     call cg_array_write_f('VelocityX',RealDouble,1,1,vx,ier)
!   VelocityY
     call cg_array_write_f('VelocityY',RealDouble,1,1,vy,ier)
!   VelocityZ
     call cg_array_write_f('VelocityZ',RealDouble,1,1,vz,ier)
!   close CGNS file
     call cg_close_f(index_file,ier)
In this case, the only information added to the CGNS file is at the CGNSBase_t level. Note that Mach and Reynolds (which are stored under ReferenceState) are variables that are known as “NondimensionalParameter”s, so they must each contain a DataClass child node stating this (the local DataClass nodes supersede the overall NormalizedByUnknownDimensional data class that holds for everything else).
The layout of the relevant portion of the resulting CGNS file from the above example is shown below. Many of the reference quantities that appear under ReferenceState_t have been left out of the figure to conserve space.
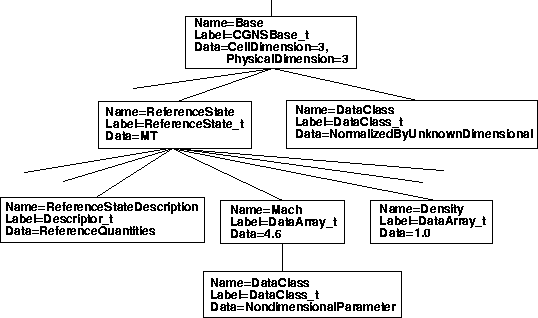
Layout of part of a CGNS file with purely nondimensional data (reference state unknown).
Flow Equation Sets
The FlowEquationSet_t node is useful for describing how a flow solution was generated. This is one of the useful self-descriptive aspects of CGNS that may improve the usefulness and longevity of a CFD dataset. For example, under this node, information such as the following may be recorded: the flow field was obtained by solving the thin-layer Navier-Stokes equations (with diffusion only in the j-coordinate direction); the Spalart-Allmaras turbulence model was employed, and an ideal gas assumption was made with γ = 1.4.
The following FORTRAN code segment writes some of the above example flow equation set information under the Zone_t node from our earlier single-zone structured grid example. (Note that a FlowEquationSet_t node can also be placed at a higher level, under the CGNSBase_t node. The usual precedence rules apply).
!   WRITE FLOW EQUATION SET INFO
      use cgns
!   open CGNS file for modify
     call cg_open_f('grid.cgns',CG_MODE_MODIFY,index_file,ier)
     if (ier .ne. CG_OK) call cg_error_exit_f
!   we know there is only one base (real working code would check!)
     index_base=1
!   we know there is only one zone (real working code would check!)
     index_zone=1
!   existing file must be 3D structured (real working code would check!)
!   Create 'FlowEquationSet' node under 'Zone_t'
     call cg_goto_f(index_file,index_base,ier,'Zone_t',index_zone,
    +   'end')
!   equation dimension = 3
     ieq_dim=3
     call cg_equationset_write_f(ieq_dim,ier)
!
!   Create 'GoverningEquations' node under 'FlowEquationSet'
     call cg_goto_f(index_file,index_base,ier,'Zone_t',index_zone,
    + 'FlowEquationSet_t',1,'end')
     call cg_governing_write_f(NSTurbulent,ier)
!   Create 'DiffusionModel' node under 'GoverningEquations'
     call cg_goto_f(index_file,index_base,ier,'Zone_t',index_zone,
    + 'FlowEquationSet_t',1,'GoverningEquations_t',1,'end')
     idata(1)=0
     idata(2)=1
     idata(3)=0
     idata(4)=0
     idata(5)=0
     idata(6)=0
     call cg_diffusion_write_f(idata,ier)
!
!   Create 'GasModel' under 'FlowEquationSet'
     call cg_goto_f(index_file,index_base,ier,'Zone_t',index_zone,
    + 'FlowEquationSet_t',1,'end')
     call cg_model_write_f('GasModel_t',Ideal,ier)
!   Create 'SpecificHeatRatio' under GasModel
     call cg_goto_f(index_file,index_base,ier,'Zone_t',index_zone,
    + 'FlowEquationSet_t',1,'GasModel_t',1,'end')
     call cg_array_write_f('SpecificHeatRatio',RealSingle,1,1,
    + gamma,ier)
!   Create 'DataClass' under 'SpecificHeatRatio'
     call cg_goto_f(index_file,index_base,ier,'Zone_t',index_zone,
    + 'FlowEquationSet_t',1,'GasModel_t',1,'DataArray_t',
    + 1,'end')
     call cg_dataclass_write_f(NondimensionalParameter,ier)
!   close CGNS file
     call cg_close_f(index_file,ier)
This particular example is specific to a 3-D structured zone. In an unstructured zone, the use of DiffusionModel is not valid. The layout of the relevant portion of the resulting CGNS file from the above example is shown below.
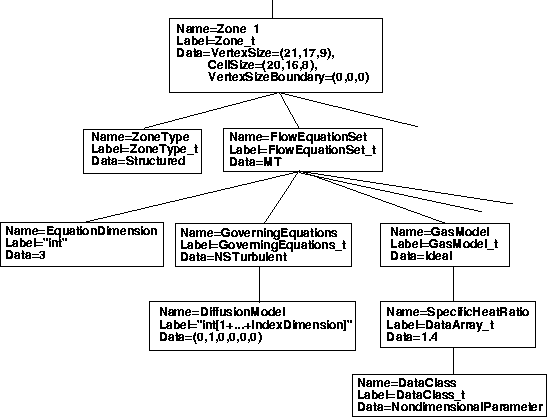
Layout of part of a CGNS file with flow equation set information.
Time-Dependent Data
Time-dependent data (data with multiple flow solutions) can also be stored in a CGNS file. Different circumstances may produce data with multiple flow solutions; for example:
Non-moving grid
Rigidly-moving grid
Deforming or changing grid
Each of these may either be the result of a time-accurate run, or else may simply be multiple snapshots of a non-time-accurate run as it iterates toward convergence.
This section gives an example for type 1 only. Readers interested in the two other types should refer to the SIDS document. For a non-moving grid, the method for storing the multiple flow solutions is relatively simple: multiple FlowSolution_t nodes, each with a different name, are placed under each Zone_t node. However, there also needs to be a mechanism for associating each FlowSolution_t with a particular time and/or iteration. This is accomplished through the use of BaseIterativeData_t (under CGNSBase_t) and ZoneIterativeData_t (under each Zone_t). BaseIterativeData_t contains NumberOfSteps, the number of times and/or iterations stored, and their values. ZoneIterativeData_t contains FlowSolutionPointers as a character data array. FlowSolutionPointers is dimensioned to be of size NumberOfSteps, and contains the names of the FlowSolution_t nodes within the current zone that correspond with the respective times and/or iterations. Finally, a SimulationType_t node is placed under CGNSBase_t to designate what type of simulation (e.g., TimeAccurate, NonTimeAccurate) produced the data. (Note: the SimulationType_t node is not restricted for use with time-dependent data; any CGNS dataset can employ it!)
The following FORTRAN code segment writes some of the above information, using our earlier single-zone structured grid example. For the purposes of this example, it is assumed that there are 3 flow solutions from a time-accurate simulation, to be output as a function of time to the CGNS file. The variables r1 and p1 represent the density and pressure at time 1, r2 and p2 are at time 2, and r3 and p3 are at time 3.
!   WRITE FLOW SOLUTION TO EXISTING CGNS FILE
      use cgns
!   open CGNS file for modify
      call cg_open_f('grid.cgns',CG_MODE_MODIFY,index_file,ier)
     if (ier .ne. CG_OK) call cg_error_exit_f
!   we know there is only one base (real working code would check!)
      index_base=1
!   we know there is only one zone (real working code would check!)
      index_zone=1
!   set up the times corresponding to the 3 solutions to be
!   stored:
      time(1)=10.
      time(2)=20.
      time(3)=50.
!   define 3 different solution names (user can give any names)
      solname(1) = 'FlowSolution1'
      solname(2) = 'FlowSolution2'
      solname(3) = 'FlowSolution3'
!   do loop for the 3 solutions:
      do n=1,3
!   create flow solution node
        call cg_sol_write_f(index_file,index_base,index_zone,solname(n),
    +     Vertex,index_flow,ier)
!   write flow solution (user must use SIDS-standard names here)
        if (n .eq. 1) then
          call cg_field_write_f(index_file,index_base,index_zone,index_flow,
    +       RealDouble,'Density',r1,index_field,ier)
          call cg_field_write_f(index_file,index_base,index_zone,index_flow,
    +       RealDouble,'Pressure',p1,index_field,ier)
        else if (n .eq. 2) then
          call cg_field_write_f(index_file,index_base,index_zone,index_flow,
    +       RealDouble,'Density',r2,index_field,ier)
          call cg_field_write_f(index_file,index_base,index_zone,index_flow,
    +       RealDouble,'Pressure',p2,index_field,ier)
        else
          call cg_field_write_f(index_file,index_base,index_zone,index_flow,
    +       RealDouble,'Density',r3,index_field,ier)
          call cg_field_write_f(index_file,index_base,index_zone,index_flow,
    +       RealDouble,'Pressure',p3,index_field,ier)
        end if
      enddo
!   create BaseIterativeData
      nsteps=3
      call cg_biter_write_f(index_file,index_base,'TimeIterValues',
    +   nsteps,ier)
!   go to BaseIterativeData level and write time values
      call cg_goto_f(index_file,index_base,ier,'BaseIterativeData_t',
    +   1,'end')
      call cg_array_write_f('TimeValues',RealDouble,1,3,time,ier)
!   create ZoneIterativeData
      call cg_ziter_write_f(index_file,index_base,index_zone,
    +   'ZoneIterativeData',ier)
!   go to ZoneIterativeData level and give info telling which
!   flow solution corresponds with which time (solname(1) corresponds
!   with time(1), solname(2) with time(2), and solname(3) with time(3))
      call cg_goto_f(index_file,index_base,ier,'Zone_t',
    +   index_zone,'ZoneIterativeData_t',1,'end')
      idata(1)=32
      idata(2)=3
      call cg_array_write_f('FlowSolutionPointers',Character,2,idata,
    +   solname,ier)
!   add SimulationType
      call cg_simulation_type_write_f(index_file,index_base,
    +   TimeAccurate,ier)
!   close CGNS file
      call cg_close_f(index_file,ier)
As cautioned for earlier coding snippets, dimensions must be set appropriately for all variables. The variable time (which is an array dimensioned size 3 in this case) contains the time values stored under BaseIterativeData_t. The layout of the resulting CGNS file from the above example is shown below. Compare this figure with the layout of a CGNS file for a simple Cartesian structured grid with a single flow solution. To conserve space, the GridCoordinates_t, ZoneType_t, and all nodes underneath FlowSolution_t have been left off.
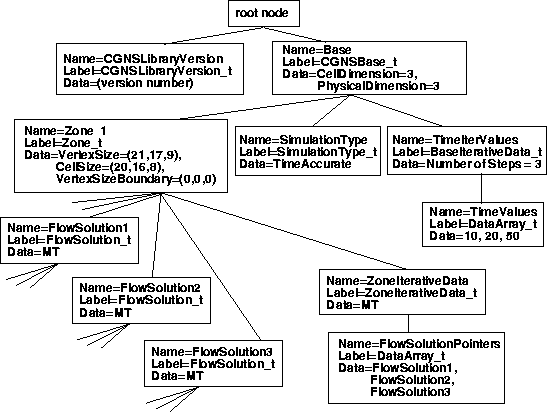
Layout of CGNS file for simple Cartesian structured grid with multiple time-accurate flow solutions (non-moving grid coordinates)
Using Links
A link associates one node to another within a CGNS tree, or even one node to another in a separate CGNS file altogether. This can be useful when there is repeated data; rather than write the same data multiple times, links can point to the data written only once.
One very important use of links that may be required by many users is to point to grid coordinates. This usage comes about in the following way. Suppose a user is planning to use a particular grid for multiple cases. There are several options for how to store the data. Among these are:
Keep a copy of the grid with each flow solution in separate CGNS files.
Keep just one CGNS file, with the grid and multiple FlowSolution_t nodes; each FlowSolution_t node corresponds with a different case.
Keep just one CGNS file, with multiple CGNSBase_t nodes. The grid and one flow solution would be stored under one base. Other bases would each contain a separate flow solution, plus a link to the grid coordinates in the first base.
Keep one CGNS file with the grid coordinates defined, and store the flow solution for each case in its own separate CGNS file, with a link to the grid coordinates.
Item 1 is conceptually the most direct, and is certainly the recommended method in general (this is the way all example CGNS files have been portrayed so far in this document). However, if the grid is very large, then this method causes a lot of storage space to be unnecessarily used to store the same grid points multiple times. Item 2 may or may not be a viable option. If the user is striving to have the CGNS file be completely self-descriptive, with ReferenceState and FlowEquationSet describing the relevant conditions, then this method cannot be used if the ReferenceState or FlowEquationSet is different between the cases (for example, different Mach numbers, Reynolds numbers, or angles of attack). Item 3 removes this restriction. It uses links to the grid coordinates within the same file. Item 4 is similar to item 3, except that the grid coordinates and each flow solution are stored in separate files altogether.
A sample layout showing the relevant portions of two separate CGNS files for an example of item 4 is shown below. Note that for multiple-zone grids, each zone in FILE 1 in this example would have a separate link to the appropriate zone’s grid coordinates in FILE 2.
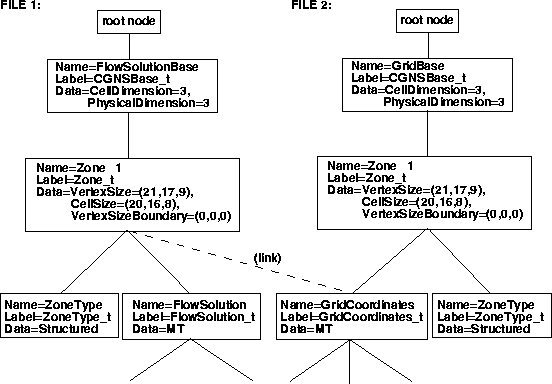
Layout of part of two CGNS files with a link from one to the grid coordinates of the other.
The CGNS API now has the capability to specify links and to query link information in a CGNS file. Previously this was only possible by use of the ADF core library software. However, when a CGNS file is open for writing and the link creation call is issued, the link information is merely recorded and the actual link creation is deferred until the file is written out upon closing it. Therefore, any attempt to go to a location in a linked file while the CGNS file is open for writing will fail. This problem does not exist when a CGNS file is open for modification as link creation is immediate.
Reading a linked CGNS file presents no difficulties for the API, because links are “transparent.” As long as any separate linked files keep their name unchanged, and maintain the same position (within the Unix-directory) relative to the parent file, opening the parent file will automatically access the linked ones.
Example Computer Codes
The following computer codes are complete, workable versions of the codes mentioned in the text of this User’s Guide (plus some that are not mentioned). They can be obtained from the CGNS site external link. They read and write very simple example CGNS files, in order to help the user understand the CGNS concepts as well as the usage of the API calls. Instructions for compiling them on LINUX systems is contained in comment lines in each program. The following codes are written in both FORTRAN and C. Note that these programs are very unsophisticated, purposefully for ease of readability. Real working codes would be written more generally, with more checks, and would not be as hardwired for particular cases. The codes are listed here by corresponding section.
Structured Grid
- Single-Zone Structured Grid:
write_grid_str.f writes grid
write_grid_str.c writes grid (C-program example)
read_grid_str.f reads grid
- Single-Zone Structured Grid and Flow Solution
write_flowvert_str.f writes vertex-based flow solution
read_flowvert_str.f reads vertex-based flow solution
write_flowcent_str.f writes cell centered flow solution
read_flowcent_str.f reads cell centered flow solution
write_flowcentrind_str.f writes cell centered flow solution with rind cells
read_flowcentrind_str.f reads cell centered flow solution with rind cells
- Single-Zone Structured Grid with Boundary Conditions
write_bc_str.f writes PointRange boundary condition patches
read_bc_str.f reads PointRange boundary condition patches
write_bcpnts_str.f writes PointList boundary condition patches
read_bcpnts_str.f reads PointList boundary condition patches
- Multi-Zone Structured Grid with 1-to-1 Connectivity
write_grid2zn_str.f writes 2-zone grid
read_grid2zn_str.f reads 2-zone grid
write_con2zn_str.f writes 1-to-1 connectivity for 2-zone example
read_con2zn_str.f reads 1-to-1 connectivity for 2-zone example
write_con2zn_genrl_str.f writes general 1-to-1 connectivity for 2-zone example
read_con2zn_genrl_str.f reads general 1-to-1 connectivity for 2-zone example
Unstructured Grid
- Single-Zone Unstructured Grid
write_grid_unst.f writes grid
read_grid_unst.f reads grid
- Single-Zone Unstructured Grid and Flow Solution
write_flowvert_unst.f writes vertex-based flow solution
read_flowvert_unst.f reads vertex-based flow solution
- Single-Zone Unstructured Grid with Boundary Conditions
write_bcpnts_unst.f writes PointList boundary condition patches (FaceCenter)
read_bcpnts_unst.f reads PointList boundary condition patches (FaceCenter)
General
- Convergence History
write_convergence.f writes convergence history
read_convergence.f reads convergence history
- Descriptor Nodes
write_descriptor.f writes descriptor node under CGNSBase_t
read_descriptor.f reads descriptor node under CGNSBase_t
- Dimensional Data
write_dimensional.f writes dimensional data to an existing grid + flow solution
read_dimensional.f reads dimensional data from an existing grid + flow solution
- Nondimensional Data
write_nondimensional.f writes nondimensional data to an existing CGNS file
read_nondimensional.f reads nondimensional data from an existing CGNS file
- Flow Equation Sets
write_floweqn_str.f writes flow equation information for structured example
read_floweqn_str.f reads flow equation information for structured example
- Time-Dependent Data
write_timevert_str.f writes time-dependent flow soln (as Vertex) for structured example
read_timevert_str.f reads time-dependent flow soln (as Vertex) for structured example