[previous] [index] [next]
Display Tree
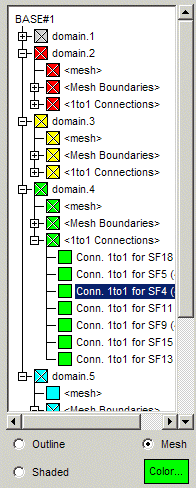 |
The display tree list is filled in when the CGNS
base is selected. The first entry in the tree will be the name of the
base. Under the base node will be the list of zones for that base. For
each zone, CGNSplot will build a list of regions which consist of the exterior
faces of the zone mesh, surface elements, and connectivities and boundary
conditions which lie on the exterior faces. These nodes will be located
under the zone node.
Nodes with a name enclosed in < > are created by CGNSplot and do
not correspond to CGNS entities in the file. For example, a structured
zone will have a node <mesh> which refers to the structured mesh,
and <Mesh Boundaries> which contains the i,j and k boundary faces
of the mesh. An unstructured mesh will contain the node <Element
Sections> under which will be located the element sets in the CGNS
file.
One to one connectivities will be grouped under a <1to1 Connections>
node, general connectivities under <General Connections>, and
boundary conditions will be under <Boundary Conditions>.
To expand and collapse individual nodes in the tree, use the icon to
the far left, or double-click the left-mouse button on the node name. You
may also expand all the nodes under a given node, by holding the Shift
key while clicking on a node name. The Control key with the left
mouse button will collapse all the nodes.
If a node contains the icon  instead of a box, this indicates that CGNSplot was unable to build the
region. If you highlight the node, a brief error message will be displayed
in the Status Line.
instead of a box, this indicates that CGNSplot was unable to build the
region. If you highlight the node, a brief error message will be displayed
in the Status Line. |
The current color and visibility state for a region is indicated by
the colored box to the left of the node name. A checked box indicates that
the visibility is enabled. In order for the region to be visible in the
Graphics
Window, it's box and all it's parent boxes must be checked. This allows
an entire zone by be turned off, for example, by just unchecking the zone
visibility box. To turn on the visibility of a node and all of it's children
nodes, hold the Shift key while clicking the left mouse button on
the node visibility box. Use the Control key will turn off the visibility
of the node and all it's children nodes.
The display mode for a region may be one of Outline, Mesh,
or Shaded, as indicated at the bottom of the tree. This shows the
mode for the currently highlighted region. Outline indicates that
the region will be shown by the edges of the region, in addition to any
feature edges in the region (edges where the angle between the shared faces
is greater than 30 degrees). Mesh shows the region with all the
mesh lines and Shaded will display it with shaded faces. The region
color is shown in the Color... button at the bottom. Clicking on
this button, will bring up a color selection panel, which allows you to
change the region color.
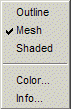 |
You may also right-mouse click on a node, which will invoke the popup
menu shown to the left, allowing changing of the mode or color. The
Info...
selection will show information about the region as described below. |
Note: When you change the mode or color for a node, the changes
are propagated to all it's children nodes.
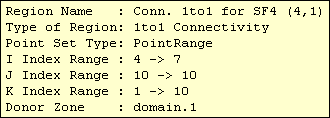
Clicking the middle mouse button on a region name, or selecting Info...
from the popup menu will display a window similar to the one below, listing
the properties of the region.
Mouse Bindings
| Mouse Binding |
On Visibility Button |
On Node Name |
| Button 1 (left) |
toggles node visibility |
highlights node |
| Button 2 (middle) |
|
shows node info window |
| Button 3 (right) |
|
invokes popup menu |
| Double-Click-Button 1 |
|
toggles open status of node |
| Shift-Button 1 |
turns on visibility of node and all children |
expands (opens) node and all children |
| Control-Button 1 |
turns off visibility of node and all children |
collapses (closes) node and all children |
[previous] [index] [next]